Introduction
There’s something magical about Mini Cheesecakes. They’re tiny, elegant, and packed with the same creamy richness you get from a full-sized cheesecake—but without the fuss! Whether you’re hosting a party, craving a sweet treat, or looking for a dessert that impresses without hours of prep, these mini cheesecakes are your perfect match.
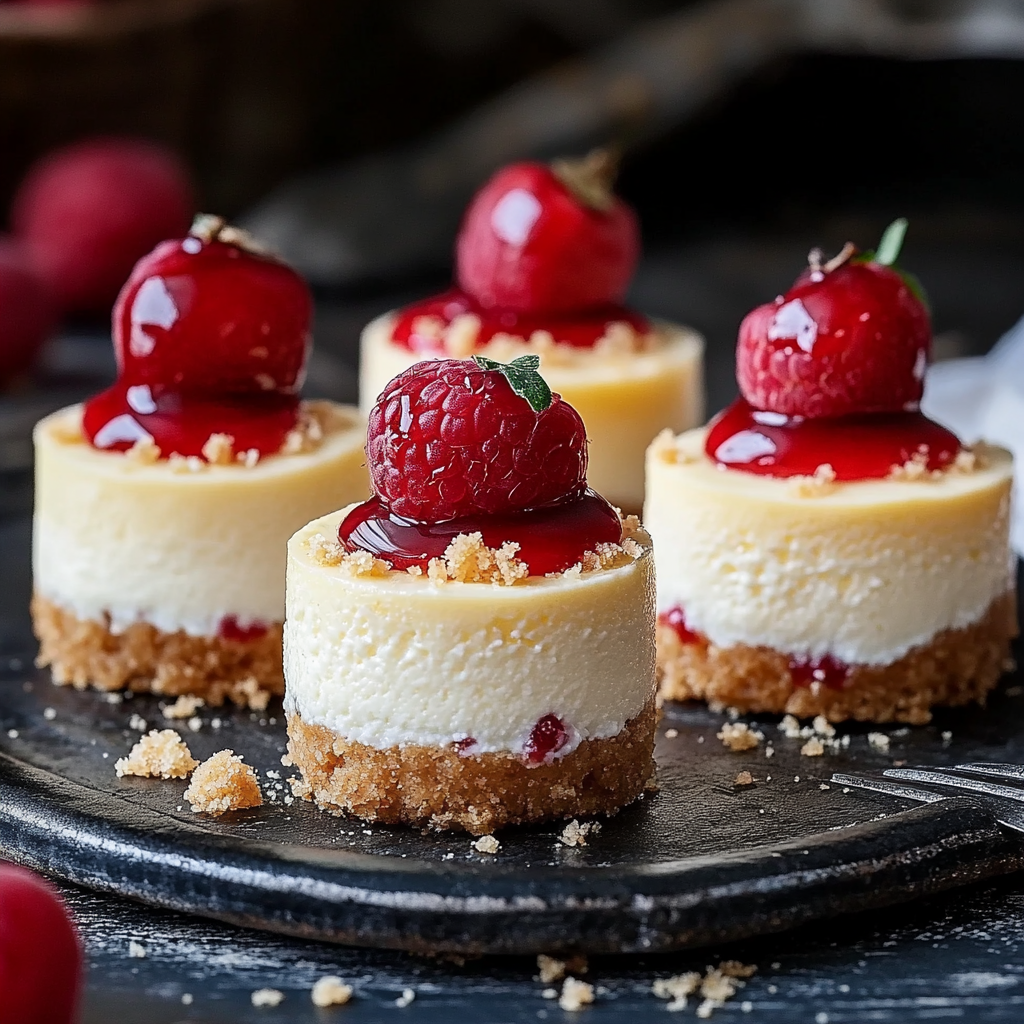
Imagine the smooth cream cheese filling resting on a crisp vanilla wafer crust, topped with glistening cherry pie filling. Sounds heavenly, right? Let’s dive into the easy step-by-step process to make your own batch of these creamy delights.
1. Ingredients You’ll Need
Before you begin, let’s gather everything you need. The beauty of this recipe lies in its simplicity—just a handful of ingredients that transform into the most delightful dessert.
Ingredients:
1 (12 ounce) package vanilla wafers
2 (8 ounce) packages cream cheese
¾ cup white sugar
2 large eggs
1 teaspoon vanilla extract
1 (21 ounce) can cherry pie filling
These are pantry staples in most kitchens, making this recipe not only delicious but also convenient.
2. Essential Tools for Perfect Mini Cheesecakes
To get the best results, you’ll need the right tools:
Mini muffin tins (preferably two 24-cup tins)
Paper liners for easy removal
Mixing bowls for wet and dry ingredients
Hand or stand mixer for a creamy texture
Measuring cups and spoons
Spatula for even mixing
Think of these tools as your mini cheesecake army—each one plays a vital role in creating perfection.
3. Step-by-Step Instructions
Let’s walk through the full process before we dive into the details:
Preheat the oven to 350°F (175°C).
Line two 24-cup miniature muffin tins with paper liners.
Crush the vanilla wafers and press about ½ teaspoon into each liner.
Mix the cream cheese, sugar, eggs, and vanilla extract until fluffy.
Fill each liner with the mixture, almost to the top.
Bake for 15 minutes until set.
Cool, then top with cherry pie filling.
And just like that—you’re ready to impress your guests with these irresistible bites!
4. Preparing the Crust
The crust is where it all begins. The vanilla wafers act as a base that provides crunch and flavor contrast to the creamy filling.
Pro Tip: Use a food processor to crush the wafers evenly. You can also use a zip-lock bag and rolling pin—just a few good whacks, and you’re done!
Once crushed, press about ½ teaspoon into each paper liner. This thin layer becomes the perfect foundation for your cheesecake mixture.
5. Making the Creamy Cheesecake Filling
Here’s where the magic happens. Combine your cream cheese, sugar, eggs, and vanilla extract in a mixing bowl.
Beat the mixture until it’s light, smooth, and fluffy—about 2–3 minutes. The cream cheese should be at room temperature for easier mixing. If it’s too cold, you might end up with lumps.
This mixture will be your silky base for every bite of your mini cheesecakes.
6. Baking the Mini Cheesecakes
Once you’ve filled each cup nearly to the top, it’s time to bake.
Bake at 350°F (175°C) for 15 minutes—just until the centers are set. They’ll puff up slightly in the oven and then settle as they cool.
Tip: Don’t overbake! Overbaking can cause cracks or dryness. The cheesecakes should jiggle slightly when done.
7. Cooling and Topping with Cherry Pie Filling
After baking, let the cheesecakes cool completely before adding the topping. This prevents the filling from melting or sliding off.
Once cool, spoon about one teaspoon of cherry pie filling over each cheesecake. The cherries not only add color but also a sweet-tart contrast that perfectly balances the creamy base.
You can refrigerate them for an hour before serving—they taste even better chilled!
8. Pro Tips for Perfect Mini Cheesecakes
Here are some secrets to help you achieve bakery-quality results every time:
Use room temperature cream cheese for a smoother filling.
Don’t skip the liners—they make cleanup effortless and keep the cheesecakes intact.
Avoid overmixing, which can incorporate too much air and cause cracks.
Cool gradually—let the cheesecakes rest in the pan before refrigerating.
Think of baking like composing music—each step must harmonize perfectly to create a masterpiece.
9. Variations to Try
The beauty of this Mini Cheesecake recipe is how easily you can adapt it.
Fruit Topping Swap: Replace cherry pie filling with blueberry, strawberry, or raspberry filling.
Chocolate Lovers: Drizzle melted chocolate or add a small chunk of chocolate in the center before baking.
Nutty Crunch: Sprinkle crushed almonds or pecans over the top before baking.
Caramel Bliss: Add a swirl of caramel sauce before baking for an extra indulgent twist.
You can make a whole dessert tray with different flavors—like a mini cheesecake sampler!
10. How to Store Mini Cheesecakes
These little gems are best served cold, but they also store beautifully:
Refrigerate: Store in an airtight container for up to 5 days.
Freeze: Wrap individually in plastic wrap, then freeze in a sealed bag for up to 2 months.
When ready to eat, thaw in the fridge overnight. They taste just as creamy as when freshly made!
11. Serving Suggestions
Presentation matters—especially for mini desserts!
Serve your Mini Cheesecakes on a decorative platter, garnished with a mint leaf or dusted with powdered sugar.
For parties, arrange them in cupcake wrappers that match your theme—these bite-sized beauties double as décor!
12. Common Mistakes to Avoid
Even simple recipes can go wrong if you miss the little details. Watch out for these pitfalls:
Using cold cream cheese – results in a lumpy texture.
Overbaking – causes dryness and cracks.
Skipping the liners – leads to sticking and breaking.
Adding topping too soon – makes it runny and messy.
Avoiding these will ensure your mini cheesecakes turn out perfect every time.
13. Healthier Alternatives
Want to lighten things up? Try these swaps:
Use low-fat cream cheese instead of full-fat.
Substitute Greek yogurt for half the cream cheese.
Reduce sugar slightly without affecting flavor.
Choose fresh fruit toppings over canned pie filling.
These changes make your mini cheesecakes guilt-free without sacrificing taste!
14. Why You’ll Love These Mini Cheesecakes
They’re more than just desserts—they’re bite-sized moments of happiness.
Each cheesecake offers a perfect balance of crunch, creaminess, and sweetness. They’re ideal for birthdays, holidays, potlucks, or just a cozy night at home.
Think of them as tiny love letters baked in paper cups—sweet, simple, and unforgettable.
15. Conclusion
Mini Cheesecakes are proof that great things truly come in small packages. With just six simple ingredients, you can whip up a dessert that looks fancy, tastes heavenly, and leaves everyone asking for more.
Whether topped with cherries or your favorite fruit, these mini delights will always steal the show. So go ahead—preheat that oven, grab your mixer, and create a batch of happiness today!
FAQs
1. Can I use a different cookie for the crust?
Yes! Graham crackers, Oreos, or digestive biscuits all work great as alternatives to vanilla wafers.
2. Can I make Mini Cheesecakes without a muffin tin?
You can use silicone molds or small ramekins, but muffin tins help maintain consistent sizes.
3. How long should I let them cool before adding the topping?
At least 30–40 minutes at room temperature, then chill in the fridge for an hour for best results.
4. Can I make these Mini Cheesecakes ahead of time?
Absolutely! They can be made up to 2 days ahead and stored in the refrigerator until ready to serve.
5. What’s the best way to make them look professional?
Top with uniform dollops of cherry pie filling, use matching liners, and chill well before serving for a clean finish.