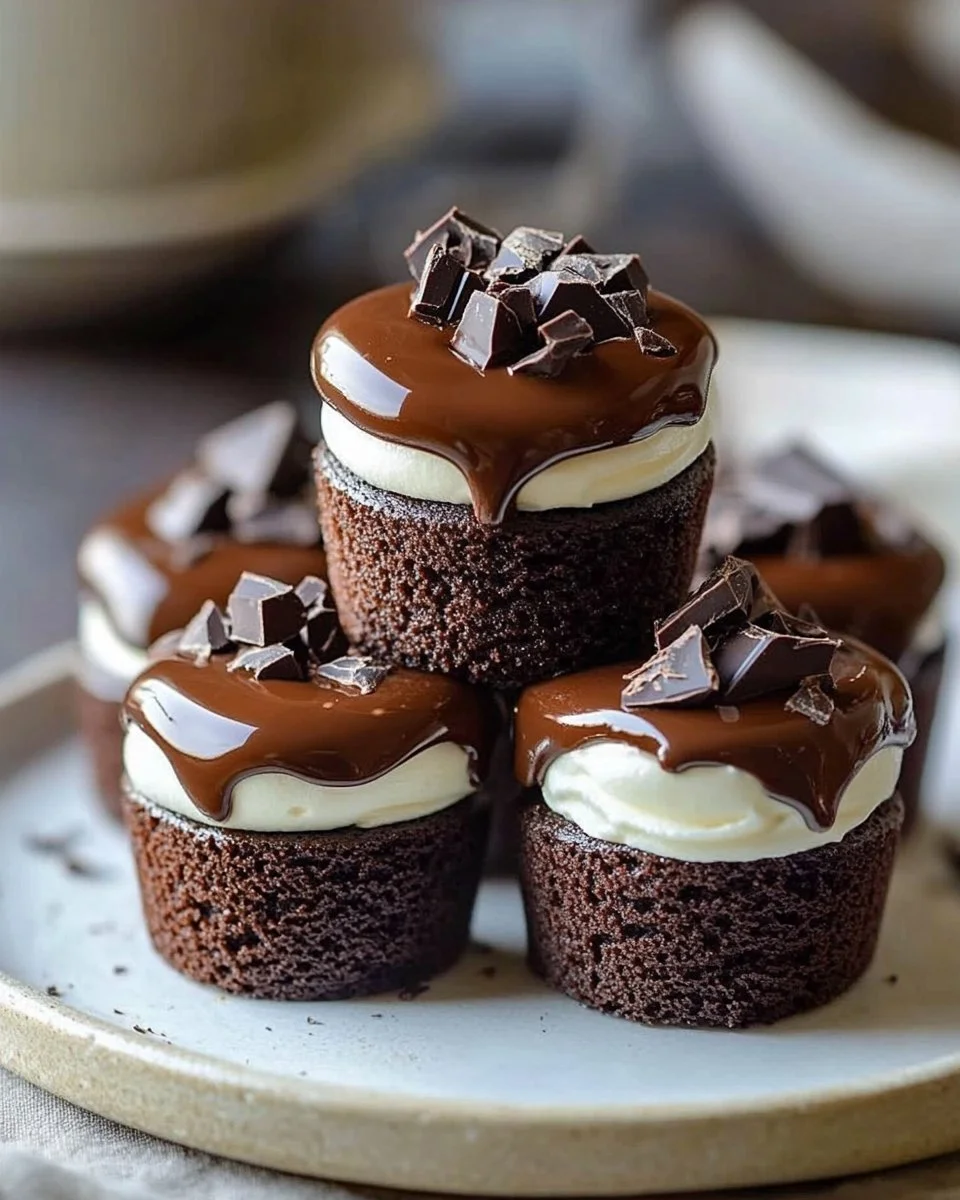
Welcome to the wonderful world of baking, where delicious smells fill your kitchen, and you create delights that bring joy to both you and those you love! Today, I’m excited to introduce you to a recipe that is sure to become a favorite: Chocolate Royale Mini Cakes. These charming little cakes are rich and moist, perfectly sized for individual servings, and topped with a luscious chocolate ganache. They are not only a treat for the taste buds but also a feast for the eyes, making them ideal for celebrations or everyday indulgences.
What makes these mini cakes so irresistible? It’s all about that perfect balance of chocolate flavor, creamy textures, and a touch of sweetness that your friends and family will love. Whether you’re an experienced baker or just starting out, this recipe is approachable and yields stunning results. So, let’s roll up our sleeves and dive into the delightful world of mini cakes!
What Makes This Recipe So Good
This Chocolate Royale Mini Cakes recipe shines for several reasons. First and foremost, it’s incredibly easy to make. With simple ingredients and straightforward steps, you’ll find yourself creating gourmet-quality desserts without the stress usually associated with baking. Furthermore, these mini cakes are baked in a fraction of the time compared to traditional layer cakes, making them perfect for impromptu gatherings or a sweet weekend project.
Additionally, the versatility of this recipe is remarkable. You can adjust the sweetness, add a hint of coffee for depth, or incorporate your favorite fruits or nuts into the batter. Plus, they are not only quick to prepare, but their small size makes portion control a breeze—ideal for those who want a sweet treat without overindulging. This recipe fulfills your chocolate cravings while keeping baking manageable and enjoyable!
Step-by-Step Breakdown of the Baking Process
At first glance, the thought of baking can seem daunting, but this recipe simplifies everything beautifully. You will start by mixing the dry ingredients in one bowl and the wet ingredients in another. This technique not only saves time but also ensures even mixing without overworking the batter. After combining, you’ll bake these mini delights until they become fluffy and springy.
Once your cakes are baked and cooled, the fun begins with the decadent ganache and whipped cream filling. Mixing the ganache involves heating cream and melting chocolate, which creates a smooth, glossy topping that is simply irresistible. Layering the whipped cream filling adds a delightful contrast to the rich chocolate. Each step flows into the next, resulting in a step-by-step assembly that’s as satisfying as it is delicious!
Ingredients
To bake Chocolate Royale Mini Cakes, you will need the following ingredients:
- 1 1⁄2 cups all-purpose flour
- 1 tsp baking powder
- 1⁄2 tsp baking soda
- 1⁄4 tsp salt
- 1 cup granulated sugar
- 3⁄4 cup unsweetened cocoa powder
- 2 large eggs
- 1 cup buttermilk
- 1⁄2 cup unsalted butter, melted
- 1 tsp vanilla extract
- 1⁄2 cup boiling water
- 1 cup heavy cream (for ganache)
- 8 oz dark chocolate, chopped
- 2 tbsp unsalted butter (for ganache)
- 1 cup heavy cream (for whipped cream filling)
- 2 tbsp powdered sugar
- 1 tsp vanilla extract (for whipped cream filling)
Each ingredient plays a crucial role: the flour provides structure, the cocoa powder imparts rich chocolate flavor, and the buttermilk ensures moisture for a tender cake. Remember to use good quality dark chocolate for the ganache—it makes a wonderful difference in flavor!

Step-by-Step Instructions
Now that you have your ingredients ready, let’s walk through the preparation of your Chocolate Royale Mini Cakes.
- Preheat your oven: Set your oven to 350°F (175°C). This is a critical step to ensure your cakes rise properly.
- Prepare the mini cake pans: Grease and flour a mini cake pan or line it with parchment paper. This prevents the cakes from sticking and makes it easy to remove them once baked.
- Mix the dry ingredients: In a large bowl, whisk together the flour, baking powder, baking soda, salt, sugar, and cocoa powder until well combined. This step ensures that the leavening agents are evenly distributed.
- Combine the wet ingredients: In a separate bowl, beat the eggs, buttermilk, melted butter, and vanilla extract until smooth. Mixing the eggs well is essential for a fluffy cake.
- Combine mixtures: Gradually add the wet ingredients to the dry ingredients, mixing gently until just combined. Overmixing can make the cake dense, so be careful!
- Add boiling water: Lastly, stir in the boiling water until the batter is smooth. This step helps to dissolve the cocoa powder fully and enhances the moisture of the cake.
- Fill the pans: Pour the batter into the prepared mini cake pans, filling each about 2/3 full. This allows space for the cakes to rise without overflowing.
- Bake: Bake for 18-20 minutes or until a toothpick inserted into the center comes out clean. Let the cakes cool completely in the pan before transferring them to a wire rack.
- Make the ganache: In a small saucepan, heat the heavy cream for the ganache over medium heat until it just begins to simmer. Remove from heat and pour the hot cream over the chopped chocolate. Stir until the chocolate is completely melted and smooth. Let the ganache cool for a few minutes to thicken slightly before pouring over the cakes.
- Whip the cream: In a chilled mixing bowl, beat the heavy cream for the whipped cream filling with powdered sugar and vanilla extract until stiff peaks form. This makes the filling luxuriously creamy and perfect for layering.
- Assemble the cakes: Once the cakes are cool, slice each cake in half horizontally to create two layers. Spread a layer of whipped cream on the bottom half of each cake and then place the top layer back on.
- Decorate: Spoon the chocolate ganache over the top of each mini cake, allowing it to drizzle down the sides. This presentation is as delightful as it is delicious!
- Garnish: If desired, add extra whipped cream or chocolate shavings for a beautiful finishing touch. Serve your Chocolate Royale Mini Cakes to wow your guests!
Helpful tip: Make sure your ingredients are at room temperature before starting to mix them; this helps create a uniform batter and a fluffier cake.
Perfect Pairings and Serving Suggestions
When it comes to serving Chocolate Royale Mini Cakes, the options are endless. These delightful treats shine just as they are, but you can elevate the experience by pairing them with complementary flavors. A scoop of vanilla ice cream or a dollop of flavored whipped cream adds a delightful contrast to the rich chocolate.
For a beverage pairing, consider serving a warm cup of coffee or a rich hot chocolate that echoes the flavors of the cakes. If you have guests over, a refreshing glass of cold milk is a timeless accompaniment that everyone loves.
These mini cakes are perfect for special occasions like birthdays, anniversaries, or even an elegant tea party. Their individual servings make them easy to share and serve, making a lovely centerpiece on any dessert table.
Storing and Reheating Instructions
If you’re lucky enough to have leftovers, storing your mini cakes is simple. Place them in an airtight container and keep them in the refrigerator for up to 3 days. Just make sure to separate layers with parchment paper to prevent sticking.
For longer storage, these mini cakes can be frozen! Wrap each cake tightly in plastic wrap and then place in a freezer-safe container. They can be stored in the freezer for up to 2 months. When you’re ready to enjoy, let the cakes thaw overnight in the refrigerator.
To reheat, remove the wrapping and place them in a preheated oven at 350°F (175°C) for about 5-10 minutes. This will help them regain their freshness and warm up the ganache if desired.
Helpful Tips for Success
To ensure that your Chocolate Royale Mini Cakes turn out perfectly, here are some pro tips:
- Measure accurately: Use the spoon and level method for dry ingredients to prevent packed-down flour or cocoa powder from affecting your cake’s texture.
- Chill your tools: For the best whipped cream, chill your mixing bowl and beaters before whipping. Cold tools help the cream whip faster and achieve better volume.
- Don’t skip the boiling water: This step is crucial for ensuring a moist cake, enhancing flavor and texture.
- Test your cakes: Insert a toothpick to check for doneness, but remember that the cakes will continue to cook while cooling in the pan.
- Be gentle with mixing: Overmixing can lead to dense cakes; mix until ingredients are just combined for the best texture.
Creative Twists and Variations
If you want to switch things up or cater to different tastes, consider the following variations:
- Add nuts: Chopped walnuts or pecans can be mixed into the batter for added texture.
- Experiment with extracts: Swap out the vanilla extract for almond extract for a different flavor profile.
- Fruity fillings: Add fresh fruits like raspberries or strawberries between the layers for a tart contrast to the sweetness.
- Make it a layered cake: If mini cakes aren’t your style, you can bake this recipe in a larger round cake pan to create a stunning layer cake.
- Gluten-free option: Substitute all-purpose flour with a gluten-free blend for a delicious gluten-free version.
Common Queries About Chocolate Royale Mini Cakes
Here are some frequently asked questions to help you with the recipe:
- Can I use regular milk instead of buttermilk? Yes, buttermilk enhances the cake’s moisture and flavor. If you don’t have buttermilk, you can make a substitute by adding a tablespoon of vinegar or lemon juice to one cup of regular milk. Let it sit for a few minutes before using.
- What if my ganache doesn’t thicken? If your ganache is too thin, let it sit at room temperature for a little longer to thicken. If that doesn’t work, you can reheat it slightly and add a bit more chopped chocolate, stirring until melted and smooth.
- Can I make these cakes ahead of time? Absolutely! You can bake and freeze the mini cakes up to two months ahead of time. Prepare the ganache and whipped cream filling just before serving.
- Why did my cake sink in the middle? This can happen due to a few reasons: overmixing, not baking long enough, or a sudden change in temperature. Always bake until a toothpick comes out clean, and avoid opening the oven door too soon.
- How do I know when the cakes are done? Keep an eye on the baking time, and always test with a toothpick. If it comes out clean or with a few moist crumbs, your cakes are ready to cool.