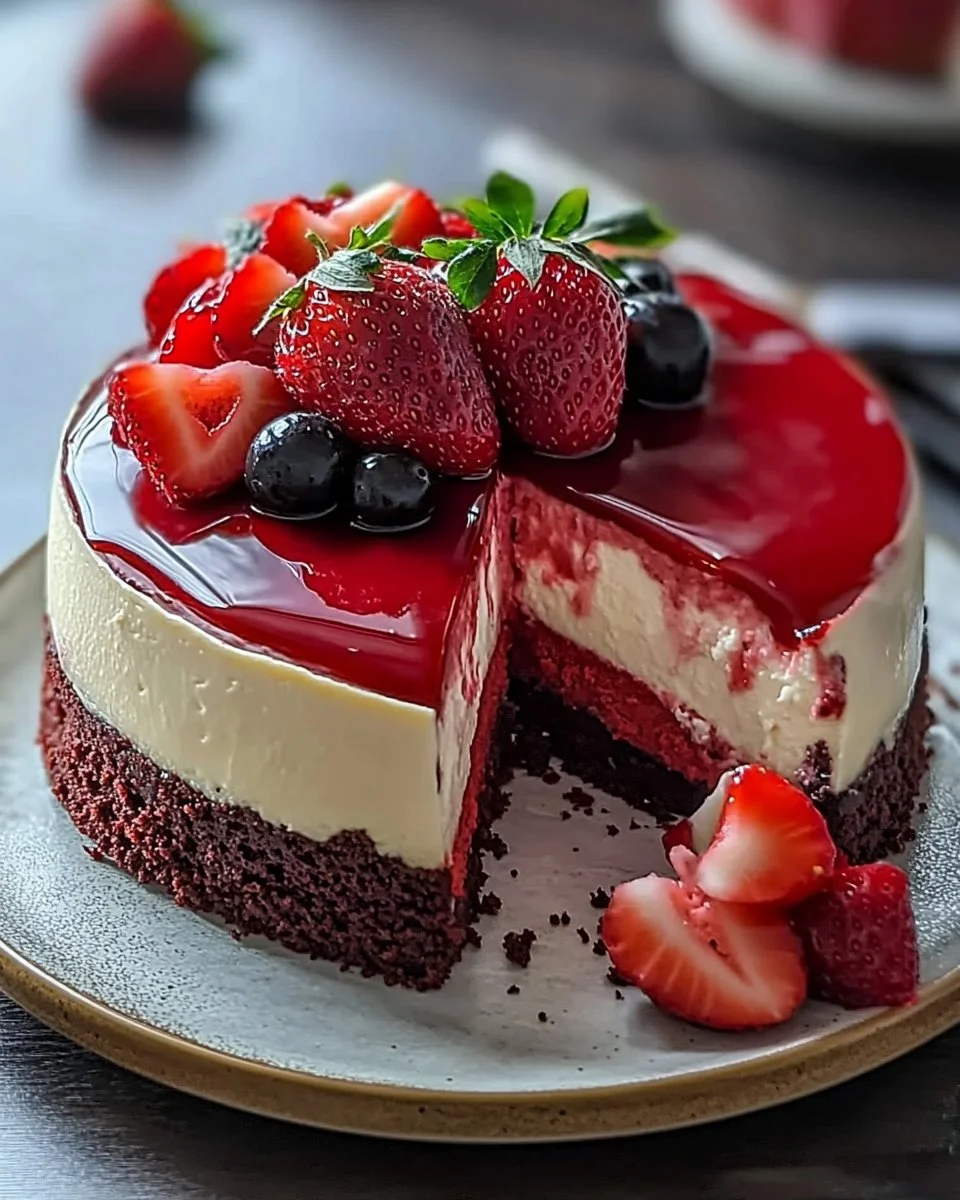
If you’re looking to impress at your next gathering or simply want to indulge in a slice of something truly delightful, then the Red Velvet Strawberry Cheesecake is the dessert for you. This stunning confection marries the rich, velvety texture of classic red velvet cake with the creamy decadence of cheesecake, topped off with the fresh brightness of strawberries. It’s a dessert that’s not only gorgeous to behold but also deliciously satisfying to eat. Get ready to elevate your dessert game with this crowd-pleaser that’s perfect for any occasion!
What Makes This Cheesecake Special
This recipe shines for a number of reasons. First, it combines familiar flavors in an unexpected way, making it both comforting and intriguing. The use of red velvet cake mix simplifies preparation, allowing for an easy-to-recreate crust that adds just the right touch of sweetness and color. Additionally, this cheesecake offers a perfect blend of rich and tangy flavors, making every bite a wonderful experience. Whether for birthdays, anniversaries, or just a Friday night treat, this recipe is budget-friendly and quick, making it accessible for any home baker.
How This Delightful Dessert Comes Together
The cooking process might seem intricate, but don’t worry! You’ll start by creating the crust from red velvet cake mix, which sets the stage for a lovely cheesecake layer above. Once baked, you’ll blend together the cream cheese filling, incorporating sweet elements like sugar and vanilla. Finally, it all bakes together in the oven, resulting in a beautifully layered dessert. And the best part? It gets even better after chilling for several hours, allowing the flavors to meld together beautifully.
Ingredients
- 1 1⁄2 cups red velvet cake mix
- 1 cup graham cracker crumbs
- 1⁄2 cup unsalted butter, melted
- 3 (8 oz) packages cream cheese, softened
- 1 cup granulated sugar
- 3 large eggs
- 1 cup sour cream
- 2 teaspoons vanilla extract
- 1 cup fresh strawberries, chopped
- 1⁄4 cup strawberry jam (for glazing)
- Fresh strawberries for garnish

Step-by-Step Instructions
Let’s dive into the details of making this beautiful cheesecake!
1. Preheat the Oven: Start by preheating your oven to 325°F (163°C). This ensures that your cheesecake bakes perfectly.
2. Prepare the Crust: In a medium bowl, combine the red velvet cake mix, graham cracker crumbs, and melted butter. Mix until everything is well blended. Press this mixture into the bottom of a 9-inch springform pan to create a firm crust. This will only need to bake for 10 minutes – just enough to set it. Once it’s done, remove it from the oven and let it cool.
3. Make the Cream Cheese Mixture: In a large mixing bowl, beat the softened cream cheese and granulated sugar together using an electric mixer. Mix until the combination is smooth and creamy, ensuring no lumps remain. This can take about 2-3 minutes.
4. Incorporate the Eggs: Next, add the eggs to the cream cheese mixture one at a time, beating well after each addition. This step is crucial for achieving a light, fluffy filling.
5. Add Final Ingredients: Now, mix in the sour cream and vanilla extract until everything is well incorporated. The sour cream adds a wonderful tanginess.
6. Bake the Cheesecake: Pour the cream cheese mixture over your cooled crust in the springform pan. Place it in the oven and bake for 45-50 minutes. You want the center to be set but still slightly jiggly, which ensures it will be creamy after cooling.
7. Cool and Chill: Once baked, let your cheesecake cool in the pan at room temperature for 1 hour. After this, move it to the refrigerator and let it chill for at least 4 hours or, ideally, overnight. This chilling time allows the flavors to blend beautifully.
8. Add the Finishing Touch: To create a lovely glaze, heat the strawberry jam in a small saucepan over low heat until it melts. After the cheesecake has chilled, gently brush the melted strawberry jam over the top for a glossy finish. Don’t forget to add fresh chopped strawberries as a garnish before serving!
Delicious Ways to Serve This Cheesecake
This beautiful cheesecake is perfect on its own, but if you’re looking to elevate your presentation, consider serving it alongside a dollop of whipped cream or a scoop of vanilla ice cream. For a refreshing drink pairing, serve it with a sparkling rosé or a glass of iced tea. It’s an excellent addition to any holiday gathering, summer barbecue, or birthday celebration – you won’t want to miss sharing it with friends and family!
How to Store and Reheat Your Cheesecake
To store any leftovers, simply cover the cheesecake with plastic wrap or place it in an airtight container. It will keep well in the refrigerator for about 4-5 days. If you have a long-term plan, you can also freeze slices of cheesecake. Just wrap them tightly in plastic wrap and then place them in a freezer-safe container. They can last for up to 2 months in the freezer!
When you’re ready to enjoy a slice from the freezer, let it thaw in the refrigerator overnight. There’s no need to reheat it, as it’s best served cold.
Expert Cooking Tips for Success
Making cheesecake can be a breeze if you follow these handy tips:
- Soften Your Cream Cheese: Make sure your cream cheese is at room temperature for a smooth filling. Leaving it out for about an hour before you start will help.
- Don’t Overmix: While you want everything well combined, overmixing can introduce too much air into the batter, causing cracks.
- Check for Doneness Carefully: Use a toothpick to check. It should come out clean or with just a few moist crumbs.
- Cool Gradually: Avoid sudden temperature changes, which can cause your cheesecake to crack.
Fun Variations to Try
If you want to put your own spin on this recipe, here are several delightful variations:
- Chocolate Twist: Add chocolate chips to the cream cheese mixture for a delicious chocolate-red velvet fusion.
- Nutty Crunch: Incorporate some finely chopped nuts into the crust for added texture.
- Fruit Swirl: Mix half of the filling with your favorite fruit puree before pouring it onto the crust for a colorful layer effect.
- Alternative Fruit Toppings: Swap out strawberries for raspberries or blueberries if you prefer different fruity flavors.
Your Questions Answered
Can I make this cheesecake ahead of time?
Yes, this cheesecake can be made 1-2 days in advance. Just be sure to cover it tightly and refrigerate.
Why is my cheesecake cracking?
Cracking usually occurs due to overmixing or baking at too high a temperature. Make sure to bake it low and slow.
Can I use low-fat cream cheese?
Yes, you can substitute low-fat cream cheese, but keep in mind that the texture might be slightly different.
What’s the best way to slice cheesecake?
Use a sharp knife, and dip it in hot water before slicing for clean edges.
Can this recipe be made gluten-free?
Absolutely! Use gluten-free graham cracker crumbs made from gluten-free ingredients.