There’s something truly special about homemade samosa sheets. They are not only versatile but also bring a delightful texture and flavor to your favorite samosa fillings. Whether you’re a seasoned cook or a kitchen newbie, this recipe will guide you in creating the perfect base for your samosas. The best part? Making these sheets at home is easier than you might think, and it allows you to customize everything to your liking. Imagine using fresh ingredients and creating a dish that everyone will rave about!
What Makes This Recipe a Game-Changer
This homemade samosa sheets recipe stands out for several reasons. First, it requires minimal ingredients that you probably already have in your pantry. Second, it’s a straightforward process that doesn’t involve complex techniques, making it perfect for cooks of all skill levels. Plus, these sheets are homemade, boasting a freshness that pre-made options simply can’t match. And let’s not forget, there’s an undeniable satisfaction that comes from making your food from scratch!
Simple Overview of the Cooking Process
Preparing your own samosa sheets can be broken down into easy steps. You start with mixing flour and salt, adding water, and kneading the dough to a smooth consistency. After a short resting period, the dough is divided into small balls, rolled out, and layered with oil for that perfect texture. Finally, you’ll quickly cook the sheets on a tawa, and voilà! You have your samosa sheets ready to be filled with your choice of delectable fillings.
Ingredients
Prep Time: 20 minutes
Cook Time: 10 minutes
Total Time: 30 minutes
Servings: 16 sheets
- 2 cups all-purpose flour (maida)
- 1/2 teaspoon salt
- 3/4 cup water (adjust as needed)
- 2–3 tablespoons oil (for brushing between layers)
- Extra dry flour for dusting
All-purpose flour is the star ingredient here, providing the right texture for the sheets. The salt enhances flavor, while oil keeps the layers from sticking together. Adjusting the water is essential; you want the dough to be soft but not sticky. Dry flour is useful for dusting while rolling out the sheets to prevent sticking.

Step-by-Step Instructions
Follow these simple steps to create your homemade samosa sheets:
- In a large bowl, add the all-purpose flour and salt. Mix well to combine the dry ingredients.
- Slowly add water, a little at a time, kneading into a smooth, medium-soft dough. The dough should be firm yet pliable, not sticky or hard to work with.
- Cover the dough and let it rest for 10–15 minutes. This helps relax the gluten and makes it easier to roll out.
- After resting, knead the dough again for 1–2 minutes until it’s smooth. Divide the dough into 16 equal balls, keeping them covered to prevent drying out.
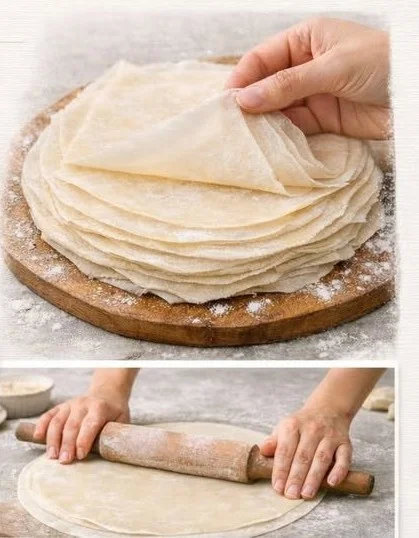
- Take one ball and roll it into a thin roti about 6–7 inches in diameter. Dust lightly with flour to prevent sticking.
- Brush oil on one roti, then sprinkle a little dry flour over it. Place another rolled roti on top, repeating this stacking process until you have 4 rotis stacked.
- Gently roll the stacked rotis into one thin, large circle. Be patient and keep it even.
- Heat a tawa or non-stick pan on medium heat. Lightly cook the large circle on both sides for a few seconds – just enough to set the structure without fully cooking.
- Immediately remove the cooked sheets and separate the layers while they are still warm. This step is crucial for creating those light, flaky layers.
- Trim the edges as needed to create a uniform shape. Your samosa sheets are now ready to use!
Delicious Ways to Serve Your Samosa Sheets
Your homemade samosa sheets can be the foundation for a wide array of dishes. Traditionally, they are filled with spiced potatoes, peas, or meat, then fried until golden brown. Consider serving them with:
- Chutneys: Mint chutney, tamarind sauce, or yogurt dip elevate the flavors.
- Salads: A fresh salad can add a crisp contrast to the crispy samosas.
- Drinks: Pair with masala chai or a cool lassi to complement the spices.
- Occasions: These are popular for snacks during parties, festive gatherings, or family get-togethers.
Best Practices for Storage and Reheating
If you have leftover sheets or want to prep ahead, proper storage is key. Here’s how to keep them fresh:
- Refrigeration: Place the samosa sheets in an airtight container lined with parchment paper. They can be stored in the fridge for up to a week.
- Freezing: For longer storage, freeze the sheets. Layer them with parchment and place them in a zip-top bag. They can last up to two months.
- Reheating: To reheat, simply place the sheets in a hot tawa or skillet for a few seconds on each side until warmed. They should be flexible yet pliable.
Expert Cooking Tips for Success
To ensure your samosa sheets turn out perfectly every time, keep these tips in mind:
- Don’t rush the resting time: This is essential for the dough’s elasticity.
- Monitor the heat: Too high can burn the sheets, while too low may cause sticking.
- Keep the dough covered: This prevents it from drying out while you’re working on other sheets.
- Experiment with thickness: If you prefer thick or thin sheets, feel free to adjust the rolling process.
Creative Variations to Try
Feel free to get creative with your samosa sheets. Here are some variations:
- Spiced Dough: Add ground cumin or ajwain (carom seeds) to your dough for an extra layer of flavor.
- Whole Wheat Flour: Substitute part or all of the all-purpose flour with whole wheat flour for a healthier option.
- Herbs and Spices: Incorporate finely chopped cilantro or parsley into the dough for added freshness.
- Manchurian Style: Use the sheets to make fusion samosas, filled with Indo-Chinese flavors like vegetables tossed in schezwan sauce.
Common Questions About Homemade Samosa Sheets
Here are some frequently asked questions to assist you further:
- Can I make the dough ahead of time? Yes, you can prepare the dough in advance and store it in the fridge for up to two days.
- How do I know if the dough is the right consistency? It should be smooth and elastic without being sticky. If it’s too sticky, add a bit more flour.
- Can I fry these sheets instead of cooking them on a tawa? While it’s not a common practice, you can fry them, but they will not have the same texture as traditionally cooked sheets.
- What can I do if the sheets are too thick? If you find your sheets are too thick, simply roll them out again to reach your desired thinness.
- Are these sheets suitable for freezing? Absolutely! Just layer them with parchment paper and store them in an airtight container or freezer bag.