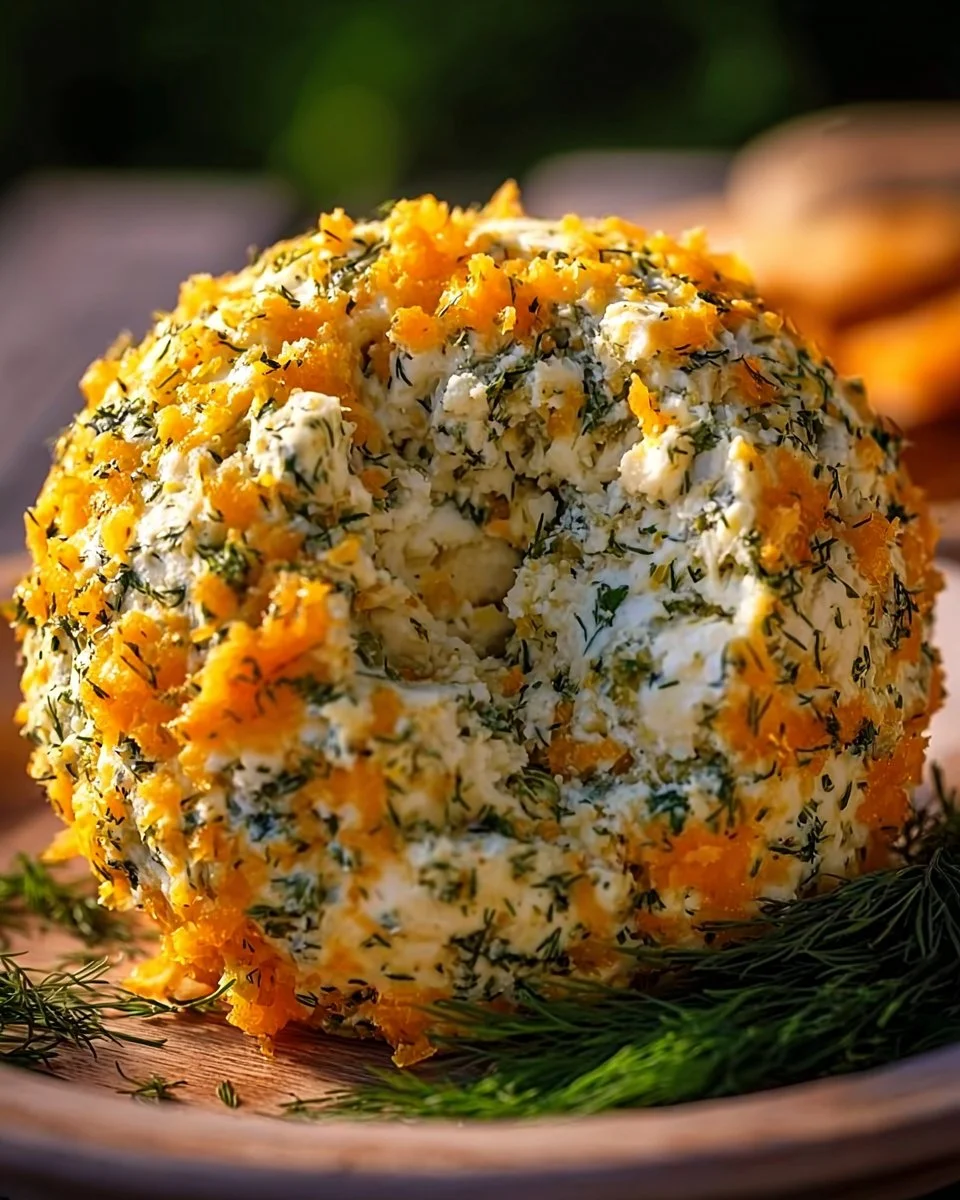
Are you ready to wow your guests at your next gathering? The Dill Pickle Cheese Ball is a delightful twist on the classic cheese ball, melding the creamy richness of cheese with the tangy crunch of dill pickles. This easy-to-make appetizer is perfect for parties, game days, or even as a fun snack for your family. With its bold flavors and texture, it certainly stands out on any cheese platter, and it’s sure to be a conversation starter!
The combination of flavors in this cheese ball is truly exceptional. The creaminess of the cream cheese and sour cream pairs beautifully with the sharp cheddar cheese, while the dill pickles and fresh dill add a refreshing zest that balances everything out. Plus, it’s quick to prepare and can be made ahead of time, making it a stress-free option for entertaining. Let’s dive into why this recipe deserves a spot on your appetizer table!
What Makes This Cheese Ball A Must-Try
This Dill Pickle Cheese Ball is a showstopper for several reasons. First, it’s incredibly easy to prepare. With just a few simple ingredients, you can whip up a creamy and delicious treat in no time. It’s also highly adaptable, allowing you to customize it according to your taste preferences. If you’re a fan of dill pickles (and who isn’t?), this recipe is especially for you as it captures the tangy essence of pickles beautifully!
Another great aspect is its versatility. This cheese ball can be served at various occasions, whether you’re hosting a holiday party, a casual game night, or even a picnic in the park. Pair it with crackers, fresh vegetables, or even bagel chips, and you’ll have a fantastic spread. Additionally, it fits well within a budget, making it attainable for any home cook eager to impress.
How This Easy Recipe Comes Together
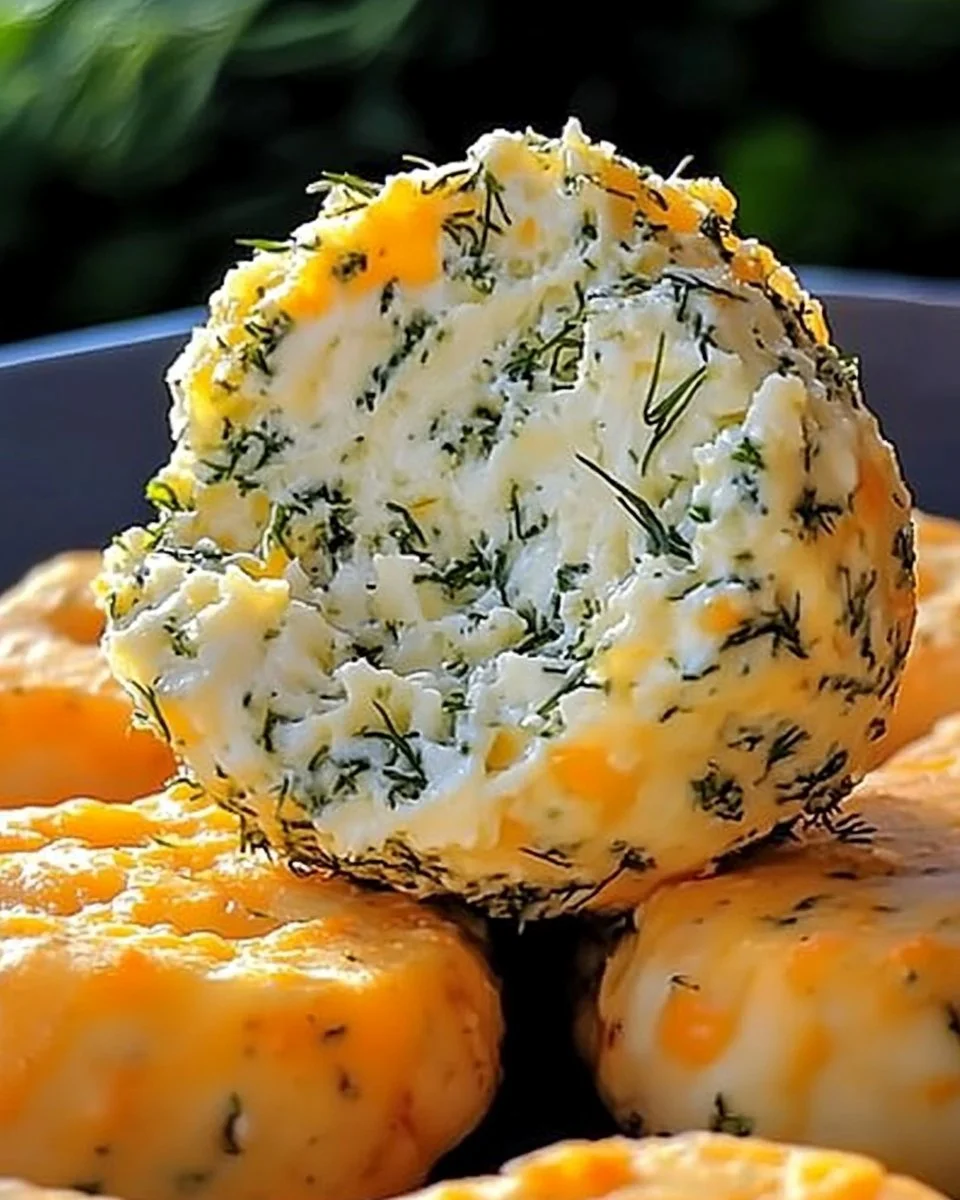
Preparing the Dill Pickle Cheese Ball is a straightforward process that even novice cooks can master. You start by mixing the main ingredients until smooth and creamy. Then, you’ll fold in the delightful additions like cheddar cheese and dill pickles, giving the mixture great texture and flavor. Shaping the mixture into a ball and rolling it in a coating of cheese, dill, and lemon zest adds a beautiful finishing touch.
After shaping, the cheese ball benefits from chilling in the refrigerator, allowing the flavors to meld together and making it easier to slice and serve. This recipe is perfect for making ahead, so you can spend less time in the kitchen and more time enjoying your party!
Ingredients
Prep Time: 15 minutes
Cook Time: 0 minutes
Total Time: 2 hours 15 minutes (includes chilling time)
Servings: 12 servings
- 16 ounces cream cheese, softened
- 4 tablespoons sour cream
- 1/2 teaspoon garlic powder
- 1 teaspoon lemon juice
- Salt and pepper, to taste
- 1 cup shredded cheddar cheese
- 1 1/2 cups chopped dill pickles
- 2 tablespoons fresh chopped dill
- 1/2 cup shredded or chopped cheddar cheese (for coating)
- 1 tablespoon fresh chopped dill (for coating)
- 1 teaspoon lemon zest (for coating)
In this recipe, the *cream cheese* serves as the creamy base, while *sour cream* adds a delightful tang. The *garlic powder* introduces a subtle depth of flavor that complements the dill pickles. Speaking of pickles, the *chopped dill pickles* are the star ingredient here, providing a crunchy texture and a burst of flavor. The fresh *dill* not only enhances the pickle flavor but also adds a touch of freshness. For the coating, the combination of *shredded cheddar cheese*, *dill*, and *lemon zest* gives the cheese ball a flavorful crust that’s hard to resist.
Step-by-Step Instructions
Follow these easy steps to create your Dill Pickle Cheese Ball:
- In a mixing bowl, combine the cream cheese, sour cream, garlic powder, lemon juice, salt, and pepper. Make sure your cream cheese is softened to ensure smooth mixing.
- Mix until well combined and smooth. You can use an electric mixer or a spatula; just ensure no lumps remain.
- Stir in the shredded cheddar cheese, chopped dill pickles, and fresh dill until evenly distributed. This is where you’ll start to see the vibrant flavors come together!
- Shape the mixture into a ball. You can use your hands or a silicone spatula to help mold it.
- In a separate bowl, combine the shredded cheddar cheese, chopped dill, and lemon zest for coating. This step adds an extra dimension of flavor to your cheese ball.
- Roll the cheese ball in the coating mixture until fully covered. Ensure every side is well coated for the best presentation!
- Wrap the cheese ball in plastic wrap and refrigerate for at least 2 hours before serving. This chilling time lets the flavors meld and makes it easier to slice.
- Serve with crackers or vegetables. It’s perfect for dipping, so have plenty of options available!
**Tip**: If you want to make the cheese ball ahead of time, you can prepare it a day prior to your event. Just keep it wrapped tightly in the refrigerator to maintain freshness.
Perfect Pairings for Serving
This cheese ball is a versatile appetizer that pairs well with a variety of sides. Here are some serving ideas:
- Serve it alongside an assortment of crackers for a classic presentation.
- Pair it with vegetable sticks like celery, bell peppers, or carrots for a fresh crunch.
- Bagel chips add a nice twist and can complement the cheese ball remarkably.
- Consider adding a charcuterie board with cured meats and olives to create a beautiful platter.
For drinks, consider light beer, white wine, or sparkling beverages that balance the richness of the cheese. Its bright flavors make this cheese ball an excellent choice for summer barbecues or casual get-togethers.
How to Store and Reheat
Storing your Dill Pickle Cheese Ball is simple. Wrap it tightly in plastic wrap or place it in an airtight container, and store it in the refrigerator. It can last for about 3 to 5 days, although it’s best enjoyed fresh.
If you want to keep it longer, this cheese ball can be frozen. Make sure to wrap it tightly in plastic wrap and then place it in a freezer-safe container. It can be frozen for up to a month. When you’re ready to enjoy it, move it to the refrigerator to thaw overnight.
Expert Tips for Success
Here are some tips to ensure your Dill Pickle Cheese Ball turns out perfect:
- Always start with softened cream cheese. This ensures it’s easy to mix into a smooth consistency.
- Adjust the seasoning to your liking, especially the salt and pepper. Remember that the pickles will also add saltiness.
- Don’t skip the chilling step. This allows the flavors to develop and the texture to firm up.
- If your mixture is too soft, add a bit more shredded cheese to help it hold its shape.
A common mistake to avoid is under-seasoning. Given that the pickles provide some salt, taste your mixture as you go to ensure the flavor profile balances well.
Fun Variations to Try
This Dill Pickle Cheese Ball can be adapted in many ways. Here are some ideas:
- Swap out the cheddar cheese for другой varieties like pepper jack for a spicy kick.
- Add some finely chopped jalapeños for an extra layer of flavor and heat.
- Mix in some cooked, crumbled bacon with the pickle mixture for a delicious smoky taste.
- Try using flavored cream cheese varieties, such as chive and onion, to enhance the flavor even more.
Feel free to experiment and find your perfect combination!
Common Questions Answered
Here are some frequently asked questions about the Dill Pickle Cheese Ball:
- Can I make this cheese ball in advance? Yes! It’s best when made a day ahead and chilled.
- What can I use instead of dill pickles? You could try bread and butter pickles for a sweeter option.
- How do I make the cheese ball less tangy? Adjust the amount of lemon juice and dill to your taste.
- Can I serve this cheese ball warm? While it’s traditionally served cold, you can let it sit at room temperature for a bit before serving.
- What should I do with leftovers? Store them in the fridge in an airtight container for up to 5 days.