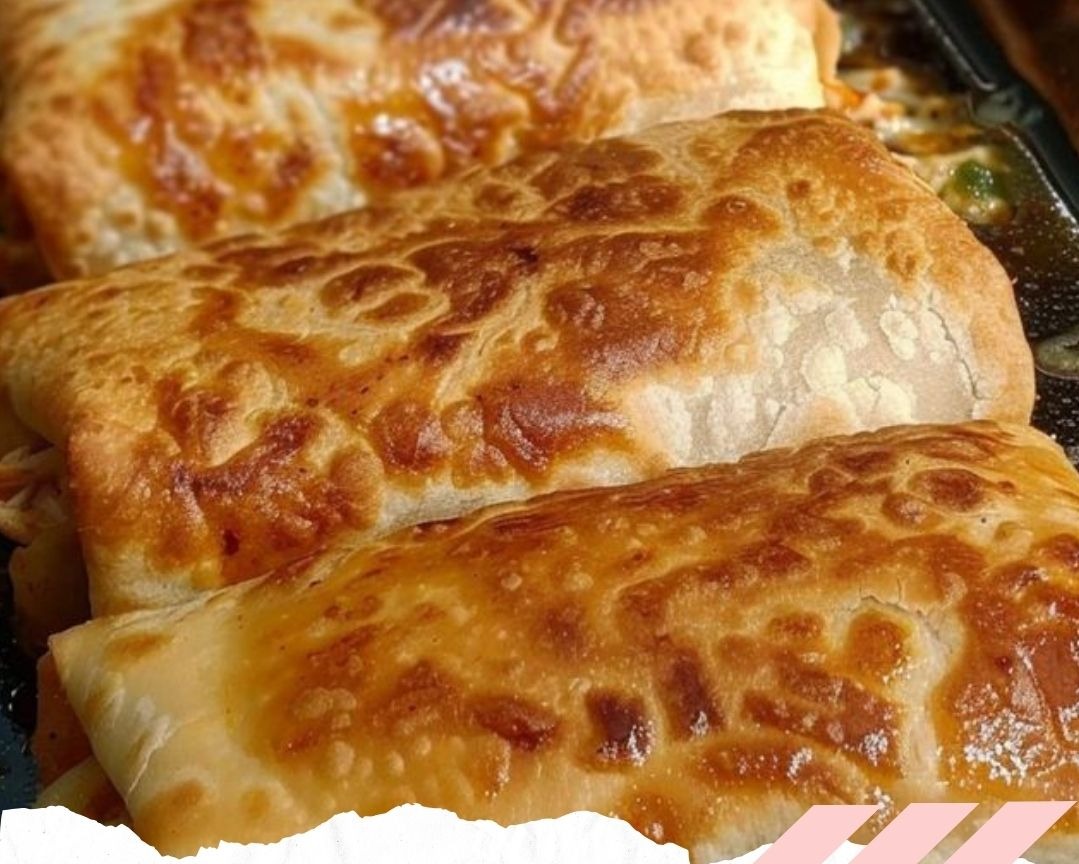
Are you craving something crunchy on the outside and packed with flavorful, juicy chicken on the inside? If so, you’re in for a treat with this Baked Chicken Chimichangas recipe! Chimichangas are typically deep-fried, but this baked version is lighter, healthier, and just as satisfying. Whether you’re new to making Mexican-inspired dishes or a seasoned cook, this recipe is simple and comes together quickly. Let’s dive into how to make this delicious dish in your own kitchen!
1. Introduction
Nothing beats a homemade meal that tastes like your favorite restaurant dish. Chimichangas, with their crunchy exterior and gooey filling, are one of those dishes that always leave you wanting more. But what if you could enjoy them without the extra oil? This Baked Chicken Chimichangas recipe brings all the flavor and crunch without the deep frying. It’s easy, cheesy, and perfect for weeknight dinners or casual get-togethers.
2. Why Baked Chimichangas?
Chimichangas are a beloved part of Tex-Mex cuisine. Traditionally, they’re deep-fried burritos stuffed with meat, cheese, and sometimes beans or vegetables. By baking them, you get the same golden-brown exterior and cheesy goodness inside, but with less grease. This recipe still gives you all the crunch you love, just with a little less guilt!
3. Ingredients You’ll Need
Before diving into the instructions, make sure you have all the necessary ingredients ready. Here’s what you’ll need:
- 8 oz cream cheese – Softened to make the filling creamy and rich.
- 8 oz Pepperjack cheese, shredded – Adds a bit of spice and gooey texture.
- 1 1/2 Tbsp taco seasoning – To bring in that bold Mexican flavor.
- 1 lb cooked chicken, shredded – Perfect for adding heartiness and protein to the chimichangas.
- 8 flour tortillas – The soft, pliable base that holds everything together.
- Cooking spray – To help the tortillas crisp up in the oven.
- Shredded cheddar cheese (for garnish) – Because extra cheese makes everything better.
- Green onions (for garnish) – Adds freshness and a mild onion flavor.
- Sour cream – A cool, creamy topping to balance the spices.
- Salsa – For that extra tang and flavor to serve on the side.
4. Step-by-Step Instructions
Follow these simple steps to make your delicious Baked Chicken Chimichangas:
- Mix the filling: In a large bowl, stir together the 8 oz cream cheese, 8 oz Pepperjack cheese, and 1 1/2 Tbsp taco seasoning. This mixture will create the creamy, cheesy base of your filling.
- Add the chicken: Once the cheeses are well mixed, fold in the 1 lb cooked, shredded chicken. The chicken will soak up the cheesy goodness, making every bite flavorful.
- Assemble the chimichangas: Divide the mixture evenly among the 8 flour tortillas. Place the filling in the center of each tortilla.
- Roll them up: Tuck in the sides of each tortilla and roll them up tightly, like a burrito. Place each chimichanga seam-side down in a greased 9×13” baking dish.
- Prepare for baking: Spray the tops of the tortillas with cooking spray. This will help them get that crispy golden-brown exterior in the oven.
- Bake: Preheat your oven to 350°F (175°C). Bake the chimichangas for 15 minutes, then carefully flip them over and bake for an additional 15 minutes until both sides are crispy.
- Garnish and serve: Once baked, serve your chimichangas topped with shredded cheddar cheese, chopped green onions, sour cream, and salsa.
5. Why Bake Instead of Fry?
You might be wondering, why bake chimichangas when you could fry them? Well, baking them allows you to enjoy the same crispy texture without the mess and extra calories that come with deep frying. Plus, baking is hands-off, letting you focus on preparing your toppings or sides while the chimichangas crisp up in the oven. It’s a healthier option without sacrificing any of the flavor.
6. Tips for Perfect Chimichangas
- Use softened cream cheese: This ensures a smooth filling that blends easily with the other ingredients.
- Don’t overfill the tortillas: It can be tempting to pack in more filling, but overfilled tortillas are harder to roll and may split during baking.
- Flip carefully: When turning the chimichangas halfway through baking, use a spatula and be gentle to avoid tearing the tortillas.
- Serve immediately: Chimichangas are best enjoyed fresh from the oven, when the tortillas are still crispy.
7. Variations You Can Try
Want to mix things up? Here are some variations on the classic baked chicken chimichanga:
- Vegetarian Chimichangas: Replace the chicken with sautéed veggies like bell peppers, mushrooms, and black beans.
- Beef Chimichangas: Swap the shredded chicken for ground beef seasoned with taco spices.
- Spicy Chimichangas: Add chopped jalapeños or a dash of hot sauce to the filling for extra heat.
8. How to Serve Your Chimichangas
Chimichangas are incredibly versatile and pair well with a variety of sides and toppings. Here are some ideas to complete your meal:
- Mexican Rice: A classic side dish that complements the flavors of the chimichangas.
- Guacamole: Creamy, rich, and perfect for dipping.
- Pico de Gallo: A fresh, tangy salsa made from tomatoes, onions, and cilantro.
9. Storing and Reheating
If you have leftovers (though that’s unlikely because these chimichangas are so tasty!), here’s how to store and reheat them:
- Storing: Place leftover chimichangas in an airtight container and store them in the fridge for up to 3 days.
- Reheating: To maintain their crispiness, reheat the chimichangas in the oven at 350°F for about 10-12 minutes.
10. Conclusion
Whether you’re making a weeknight dinner or preparing a dish for a gathering, Baked Chicken Chimichangas are a crowd-pleaser. They’re crispy, cheesy, and loaded with flavor. Plus, since they’re baked, you can enjoy all the crunch without the guilt of deep-frying. Give this recipe a try, and don’t be surprised if it becomes a family favorite!
11. FAQs
1. Can I use corn tortillas instead of flour tortillas?
Yes, but keep in mind that corn tortillas are smaller and less pliable, so they might be harder to roll and may crack during baking.
2. Can I make these chimichangas ahead of time?
Absolutely! You can assemble the chimichangas and store them in the fridge for a few hours before baking. Just make sure to add a few extra minutes to the baking time if they’re cold.
3. Can I freeze baked chimichangas?
Yes, baked chimichangas freeze well. Let them cool completely, wrap each chimichanga tightly in foil, and store in a freezer-safe bag for up to 3 months.
4. What can I use as a substitute for Pepperjack cheese?
You can replace Pepperjack cheese with Monterey Jack, cheddar, or even mozzarella for a milder flavor.
5. How can I make the chimichangas spicier?
For extra spice, add diced jalapeños or a splash of hot sauce to the filling, or use a spicier taco seasoning blend.
Enjoy your Baked Chicken Chimichangas and savor every crispy, cheesy bite!


