Introduction
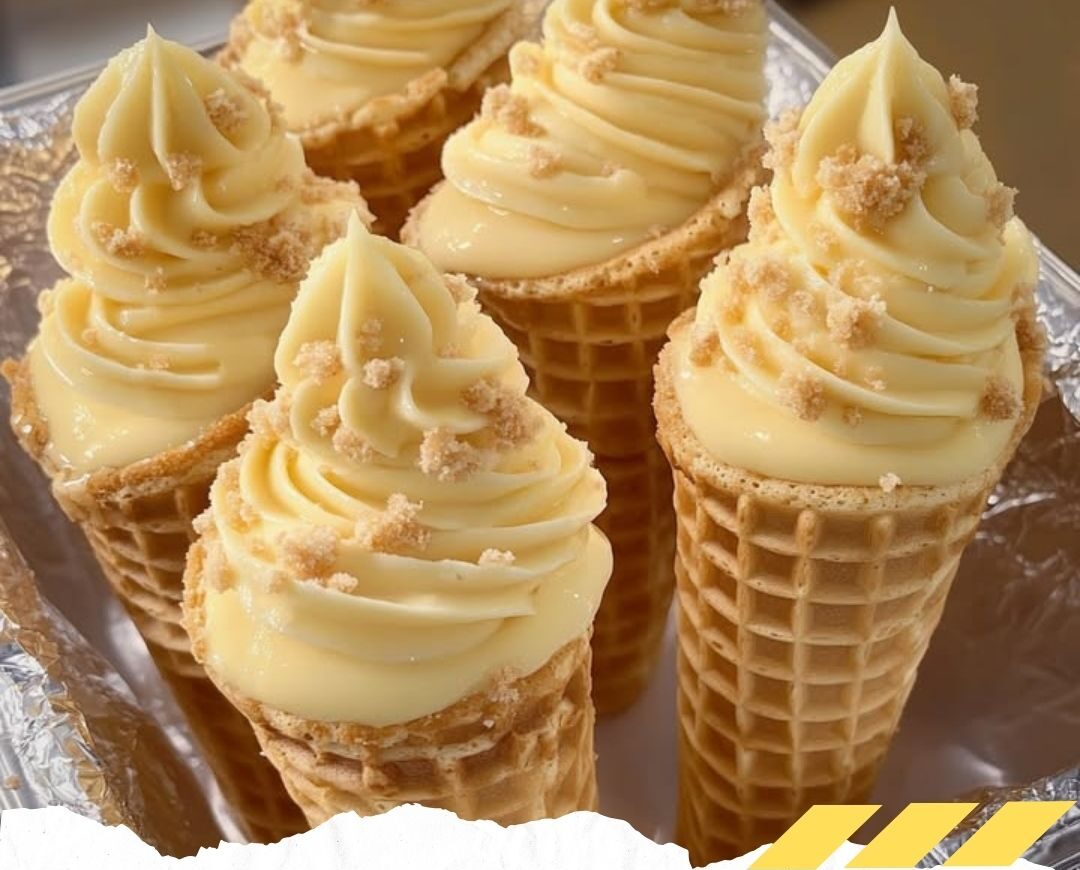
Picture this: the creamy richness of banana pudding meets the tangy delight of cheesecake, all packed into a crispy waffle cone. Sounds dreamy, right? Banana Pudding Cheesecake Cones are not just desserts; they’re an experience—a delightful blend of textures and flavors that’s sure to wow your taste buds. Whether you’re planning a party, a family gathering, or simply craving something sweet, these cones are your go-to treat. Let’s dive into this irresistible recipe!
1. Ingredients Overview
Let’s break down what makes this dessert so special:
For the Cheesecake Filling
- 2 (8 oz) packages cream cheese, softened: Provides a rich and creamy base.
- ½ cup powdered sugar: Sweetens the filling to perfection.
- ½ cup sour cream: Adds tanginess.
- ¼ cup heavy cream: Contributes silkiness to the mixture.
- 1 tsp vanilla extract: Enhances all the flavors.
- ½ cup banana pudding mix (instant): Delivers that nostalgic banana flavor.
- ½ cup milk: Helps blend the pudding mix.
- 2 ripe bananas, mashed: Real fruit for an authentic taste.
For the Waffle Cones
- 6 to 8 waffle cones (store-bought): Provide a convenient, crunchy base.
For the Topping
- ½ cup crushed vanilla wafer cookies: Add crunch and complement the banana flavor.
- Whipped cream (optional): A dollop on top makes it look irresistible.
2. Tools You’ll Need
Having the right tools makes this recipe a breeze:
- Mixing bowls: Essential for blending ingredients.
- Electric mixer: Ensures a smooth and creamy filling.
- Piping bag: Helps achieve that perfect swirl in the cones.
- Spoons and spatulas: For folding and scooping.
3. The Magic Behind the Filling
The cheesecake filling is the heart of this dessert. Start by beating softened cream cheese with powdered sugar until velvety smooth. This creates the creamy base. Adding sour cream and heavy cream ensures the mixture is luscious yet light. The banana pudding mix and milk blend seamlessly into this, bringing that nostalgic flavor we all love. Finally, mashed ripe bananas add a natural sweetness and a touch of texture.
Pro Tip: Chill the filling for at least 30 minutes to ensure it’s firm enough to pipe into the cones.
4. Crafting the Perfect Waffle Cones
While store-bought waffle cones are convenient, you can also make your own if you’re feeling adventurous. Homemade cones allow you to experiment with flavors—imagine chocolate or cinnamon waffle cones pairing with the banana cheesecake filling!
5. Assembling Your Masterpiece
Here’s where the fun begins! Use a piping bag to fill each cone with the chilled cheesecake mixture. Swirl it beautifully to mimic soft-serve ice cream. This step is all about presentation, so take your time to make each cone picture-perfect.
6. Topping Ideas for Extra Flair
Toppings are the cherry on top (sometimes literally!). Here are some ideas:
- Crushed vanilla wafers: Add crunch and complement the banana flavor.
- Whipped cream: A dollop on top makes it look irresistible.
- Drizzled caramel or chocolate sauce: For those who love extra sweetness.
- Sliced bananas: A fresh, fruity touch.
7. Serving Suggestions
These cones are best served chilled. Arrange them upright in a cone stand or place them in small cups to keep them stable. They’re perfect for dessert tables, summer parties, or even as a sweet snack on a lazy afternoon.
8. Tips for Storing Leftovers
While it’s unlikely you’ll have leftovers, here’s how to store them:
- Filling: Keep in an airtight container in the refrigerator for up to 3 days.
- Assembled cones: Best enjoyed fresh, but you can store them in the fridge for a few hours. Note that the cones may soften over time.
9. Customization Options
Make this dessert uniquely yours:
- Swap the filling: Use chocolate or strawberry pudding mix for a new flavor twist.
- Try different cones: Sugar cones or even cookie cups work beautifully.
- Add mix-ins: Fold in mini chocolate chips or crushed nuts for added texture.
10. Why Everyone Loves This Dessert
Banana Pudding Cheesecake Cones are:
- Easy to make: No baking required.
- Fun to eat: Who doesn’t love food served in a cone?
- Perfectly balanced: The creamy filling and crunchy cone create a delightful contrast.
- Customizable: Tailor it to your taste preferences.
FAQs About Banana Pudding Cheesecake Cones
1. Can I use homemade banana pudding instead of instant mix?
Absolutely! Just ensure it’s thick enough to blend well with the cheesecake filling.
2. How can I prevent the waffle cones from getting soggy?
Serve the cones immediately after assembling. Alternatively, brush the inside of the cones with melted chocolate and let it harden before adding the filling.
3. Can I make this recipe dairy-free?
Yes! Use dairy-free cream cheese, plant-based milk, and coconut cream as substitutes.
4. How far in advance can I prepare these cones?
You can prepare the filling a day ahead, but assemble the cones just before serving for the best texture.
5. Are there any gluten-free options?
Yes, opt for gluten-free waffle cones and cookies to make this recipe suitable for those with gluten sensitivities.
Conclusion
Banana Pudding Cheesecake Cones are more than just a dessert; they’re a delightful treat that brings joy with every bite. Easy to make, endlessly customizable, and perfect for any occasion, this recipe is sure to become a favorite. Gather your ingredients, grab those waffle cones, and get ready to impress your family and friends with this show-stopping dessert!