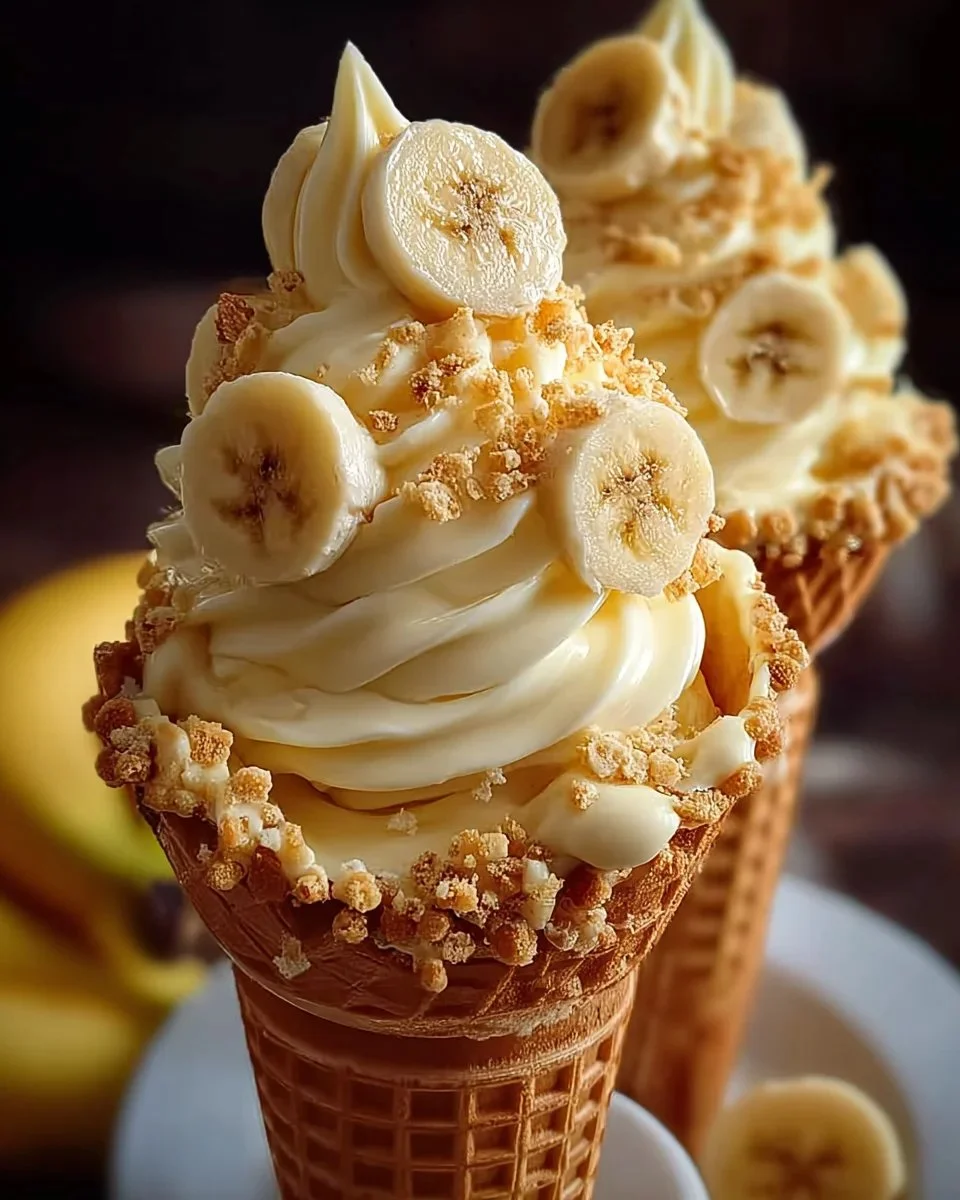
If you’re looking for a delightful dessert that combines the classic flavors of banana pudding with the fun of ice cream cones, then you’ve come to the right place! Banana Pudding Cheesecake Cones are not only a treat to the taste buds but also a feast for the eyes. With layers of creamy banana cheesecake filling, fresh banana slices, and crunchy vanilla wafers, these cones will quickly become a favorite for gatherings and family desserts alike. They are simple to prepare, exquisite in presentation, and utterly delicious, making them a perfect dessert for any occasion.
What Makes This Recipe So Good
This recipe stands out for several compelling reasons. First, it brings together two beloved desserts—banana pudding and cheesecake—in a fun, portable format. The waffle cones add a satisfying crunch that perfectly contrasts with the creamy filling. Moreover, this dessert is incredibly easy to whip up. With just a few ingredients and minimal prep time, you can have these delightful cones ready to impress your friends and family. Best of all, they are customizable, allowing you to add your own twist to the classic flavors.
How This Delicious Dish Comes Together
The process of creating Banana Pudding Cheesecake Cones is straightforward, making it suitable for cooks of all skill levels. You start by preparing a rich creamy mixture that serves as the filling. Once combined, you’ll chill this mixture to enhance its flavor and texture. After chilling, simply fill the waffle cones, top them with sliced bananas, whipped cream, and additional crushed vanilla wafers, and serve! This easy assembly method keeps the effort low while the visual appeal and flavors remain high.
Ingredients
Prep Time: 30 minutes
Cook Time: 0 minutes
Total Time: 30 minutes plus chilling
Servings: 12
- 8 ounces cream cheese, softened
- 1 cup granulated sugar
- 1 teaspoon vanilla extract
- 1 cup sour cream
- 1 cup heavy cream
- 1/2 cup banana puree (about 2 ripe bananas)
- 1/2 cup crushed vanilla wafers
- 12 waffle cones
- 2 bananas, sliced
- Whipped cream, for garnish
- Additional crushed vanilla wafers, for garnish
Each ingredient plays an essential role in this recipe. The cream cheese and sour cream create a smooth base, while the heavy cream adds richness and stability. Banana puree infuses natural sweetness and banana flavor, making this dessert reminiscent of homemade banana pudding. Finally, the vanilla wafers add texture and a classic taste!
Step-by-Step Instructions
Follow these simple steps to create your Banana Pudding Cheesecake Cones, and enjoy the accolades from your friends and family!
- Beat the softened cream cheese in a large bowl until it’s smooth and creamy.
- Mix in the granulated sugar and vanilla extract until everything is well combined.
- Add in the sour cream and heavy cream, blending until the mixture is creamy and fluffy.
- Fold in the banana puree and crushed vanilla wafers gently, ensuring not to deflate the mixture.
- Chill the mixture in the refrigerator for about 30 minutes to allow it to firm up slightly.
- After chilling, pipe or spoon the creamy mixture into the waffle cones, filling them generously.
- Top each cone with sliced bananas, a dollop of whipped cream, and sprinkle additional crushed vanilla wafers on top for garnish.
- Serve immediately for the best texture and flavor, and enjoy every bite!
Tip: Ensure your cream cheese is at room temperature before starting; this makes it much easier to beat and achieve a smooth texture.
Perfect Pairings and Serving Suggestions
These delightful cones can be served in various ways. For a complete dessert table, pair them with fresh fruit, such as strawberries or blueberries, to add vibrant color and flavor contrast. They also work wonderfully alongside coffee or sweet tea for afternoon gatherings or picnics.
These cones are perfect for birthday parties, baby showers, or even casual weeknight treats. If you want to elevate the experience further, consider serving them on a decorative platter or with fun sprinkles for added flair!
How to Store and Reheat
To maintain the freshness of your Banana Pudding Cheesecake Cones, it’s best to serve them immediately after filling. However, if you find yourself with leftovers, you can store the cheesecake mixture separately in an airtight container in the refrigerator. The cones can also be kept in a sealed bag to prevent them from getting stale.
Once ready to serve again, simply refill your cones and garnish as desired. Avoid freezing filled cones, as the texture of the waffle cones may become soggy once thawed.
Expert Tips for the Best Results
Here are some handy tips to ensure your Banana Pudding Cheesecake Cones are a hit:
- Allow the cream cheese to soften completely for a smooth batter.
- Taste the mixture before chilling; adjust sweetness with more sugar if needed.
- Only fill the cones just before serving to maintain their crispness.
- For an added flavor twist, consider drizzling some melted chocolate over the top.
Common mistakes to avoid include over-mixing the banana puree, which can result in a less creamy filling. Make sure to fold gently!
Creative Variations to Try
Feel free to customize your Banana Pudding Cheesecake Cones to fit your taste preferences. Here are a few ideas:
- Use a different fruit puree, such as strawberry or peach, for a new flavor profile.
- Swap out the vanilla wafers for another cookie, like graham crackers or chocolate cookies.
- Add a sprinkle of cinnamon or a hint of nutmeg for a warm spice note.
- Use flavored whipped cream, such as chocolate or caramel, as a topping.
These variations will not only keep the recipe exciting but can also cater to different dietary preferences or seasonal ingredients.
Common Questions and Answers
Here are some frequently asked questions to help guide you through making these delicious cones:
- Can I make the filling a day in advance? Yes, you can prepare the filling ahead of time and store it in the refrigerator. Just be sure to fill the cones right before serving.
- Are there any gluten-free options? Absolutely! Use gluten-free cones and check that the vanilla wafers are gluten-free as well.
- How can I make this recipe dairy-free? Substitute a dairy-free cream cheese alternative and coconut cream for the heavy cream.
- What’s the best way to crush the vanilla wafers? You can use a food processor or place them in a plastic bag and crush them with a rolling pin for a more hands-on approach.
- Can I freeze these cones? It’s not recommended to freeze filled cones due to texture changes. However, the filling can be frozen for later use.