Introduction
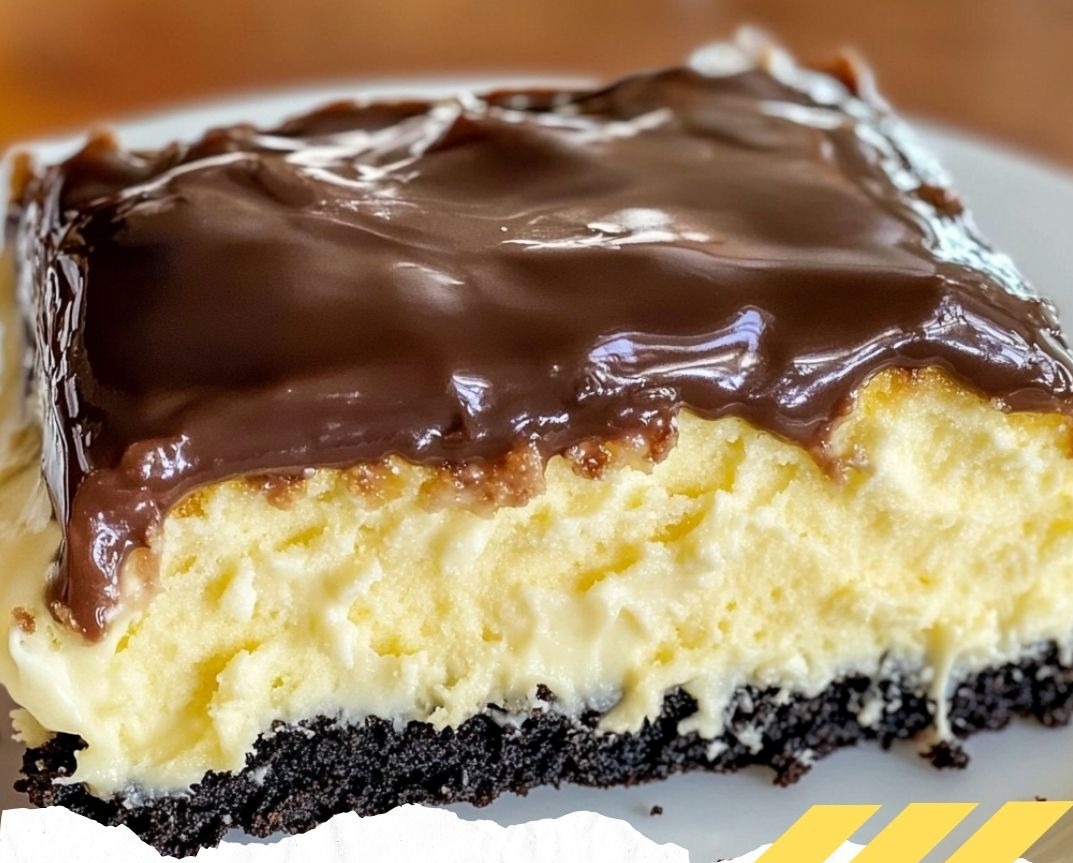
Have you ever craved Boston Cream Pie but didn’t want to deal with all the steps? Well, you’re in luck. The Boston Cream Poke Cake Recipe is your shortcut to dessert heaven. With layers of moist yellow cake, creamy vanilla custard, and rich chocolate ganache, it’s like the classic pie got a delicious cake makeover. Think of it as a nostalgic favorite wearing comfy pajamas—it’s cozy, comforting, and always welcome at the table.
This dessert is a crowd-pleaser, perfect for birthdays, potlucks, or a casual treat-yourself weekend. And the best part? It’s so easy, anyone can make it—yes, even if you’re not a pro baker.
Let’s dive into this heavenly dessert and learn how to make it from scratch (well, semi-scratch).
1. Why You’ll Love This Recipe
Simple to Make: Uses cake mix and instant pudding—perfect for beginners.
Insanely Delicious: Each bite is soft, creamy, and rich with chocolate.
Time Saver: Quick prep and chill time compared to the traditional Boston Cream Pie.
Crowd Favorite: Perfect for any celebration or casual get-together.
2. What is a Boston Cream Poke Cake?
Imagine all the elements of a Boston Cream Pie—vanilla cake, creamy custard, and chocolate topping—but made easier. The “poke” part refers to poking holes into a baked cake and filling them with custard. This lets all the flavor seep into every bite, making it extra moist and decadent. It’s like your cake took a luxurious spa day in vanilla pudding.
3. Ingredients You’ll Need
Let’s keep it straightforward. Here’s what you’ll need:
For the Cake:
1 (15.25 oz) box yellow cake mix
Ingredients listed on the box (typically eggs, oil, and water)
Or use your favorite homemade vanilla cake recipe.
For the Custard Filling:
1 (3.4 oz) box instant vanilla pudding mix
2 cups (480ml) cold whole milk
For the Chocolate Ganache:
1 cup (175g) semi-sweet chocolate chips
½ cup (120ml) heavy cream
1 tbsp butter
1 tsp vanilla extract
Optional: Powdered sugar for dusting
4. How to Choose the Right Cake Mix
Yellow cake mix is traditional, but you can switch it up. Just avoid anything with added pudding in the mix—it can throw off the texture. If you’re feeling bold, you could even try vanilla bean or French vanilla.
5. Step-by-Step Instructions
Bake the Cake
Preheat your oven and grease a 9×13-inch pan.
Prepare the yellow cake mix according to the box.
Pour the batter into the pan and bake as directed.
Let the cake cool for at least 15 minutes.
6. How to Make the Custard Filling
This step is where the magic happens.
In a mixing bowl, whisk the pudding mix with cold milk for 2 minutes.
Use the handle of a wooden spoon to poke holes all over the cake.
Pour the pudding over the cake, spreading it evenly and pushing it into the holes.
Refrigerate for 1 hour to allow the pudding to set.
7. Perfecting the Chocolate Ganache
Ganache might sound fancy, but it’s surprisingly easy.
Heat the cream until it’s steaming (but not boiling).
Pour it over the chocolate chips and butter in a bowl.
Let it sit for 2 minutes, then stir until smooth and glossy.
Stir in vanilla extract.
Pro tip: Let it cool slightly before pouring so it doesn’t melt the pudding layer.
8. Tips for Poking the Cake
Use the round end of a wooden spoon or something of similar size. You want decent-sized holes so the custard can really get in there. Don’t go all the way to the bottom—just about ¾ of the way down.
9. Chilling and Serving
After you’ve topped the cake with ganache, chill it again for at least 30 minutes. This helps the ganache set and makes slicing easier.
But hey, if you like things gooey, feel free to dig in right away. We won’t judge.
10. Customization Ideas
Want to make it your own? Try these variations:
Chocolate cake + chocolate pudding for chocoholics.
Strawberry glaze instead of ganache for a fruity twist.
Top with whipped cream or fresh berries for extra flair.
11. Troubleshooting Common Issues
Cake too dense? You may have overmixed the batter.
Pudding too runny? Be sure to use whole milk and mix for the full 2 minutes.
Ganache not setting? Chill longer or add a bit more chocolate.
12. Storing and Freezing Instructions
Store: Cover and keep in the fridge for up to 4 days.
Freeze: Slice into portions, wrap tightly, and freeze for up to 2 months. Thaw in the fridge overnight before serving.
13. Pairing Suggestions
This cake goes great with:
Coffee or espresso for a café vibe
Vanilla ice cream for the ultimate indulgence
A glass of milk for a nostalgic dessert combo
14. Why It’s Great for Gatherings
This cake serves a crowd, looks beautiful, and doesn’t require a fork-and-knife situation. Perfect for birthday parties, family dinners, or when you want to impress with minimal effort.
15. Final Thoughts
The Boston Cream Poke Cake Recipe is everything you love about a classic dessert but simplified for everyday life. It’s creamy, chocolatey, and totally satisfying. Whether you’re hosting guests or just treating yourself, this cake never disappoints.
So go ahead—poke some holes, pour that pudding, and drizzle the ganache. Your taste buds (and your guests) will thank you.
Frequently Asked Questions
1. Can I use homemade pudding instead of instant pudding mix?
Yes, but it should be thick enough to stay in the holes. Let it cool slightly before pouring.
2. What type of chocolate chips work best for ganache?
Semi-sweet chips give a balanced flavor. Milk chocolate will be sweeter, and dark chocolate will be more intense.
3. Can I make this cake a day in advance?
Absolutely! It actually tastes better the next day as the flavors settle and meld.
4. Do I have to poke holes in the cake?
It’s essential for this recipe! The holes let the pudding sink in and create the creamy texture.
5. Can I use plant-based milk instead of whole milk?
It’s possible, but results vary. Whole milk gives the best consistency for the custard layer.
Want to impress without stress? This Boston Cream Poke Cake Recipe is your go-to dessert. Easy, delicious, and loved by all.