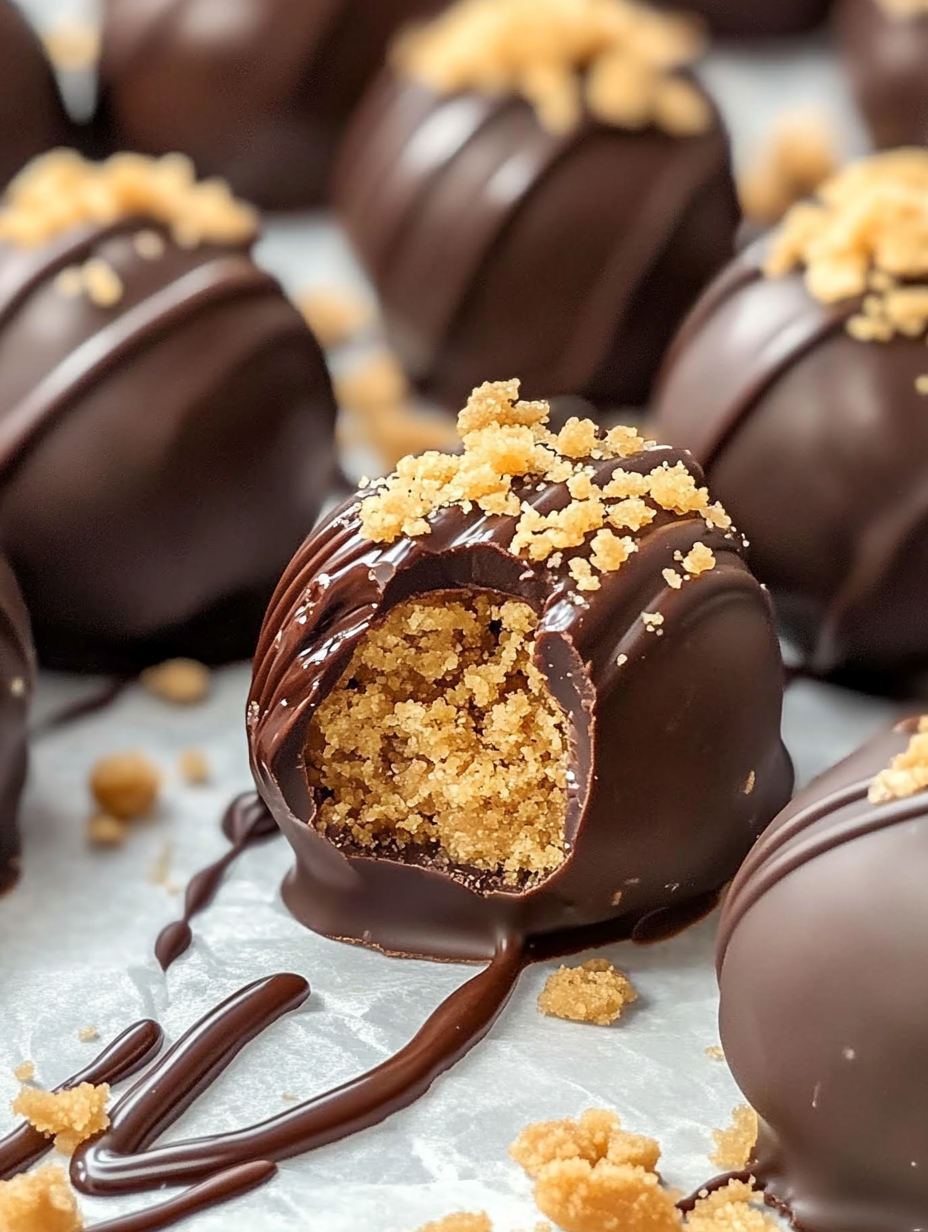
If you’ve ever found yourself sneaking a Butterfinger bar from the candy bowl, you’re going to love this recipe. Butterfinger Balls are rich, crunchy, chocolate-coated bites of pure joy. They’re the kind of treat that disappears from the dessert table before you even grab a second one.
What makes them so special? Imagine your favorite candy bar wrapped in a creamy peanut butter center, then dipped in smooth chocolate. It’s like a little edible treasure chest—crisp on the outside, soft and sweet inside. And the best part? No oven required.
Let’s dive into everything you need to know about making the perfect batch of Butterfinger Balls.
Table of Contents
| Sr# | Headings |
|---|---|
| 1 | Why You’ll Love Butterfinger Balls |
| 2 | Ingredients Overview |
| 3 | Preparation & Timing Details |
| 4 | Step-by-Step Instructions |
| 5 | Pro Tips for Perfect Texture |
| 6 | Choosing the Right Chocolate |
| 7 | Storage & Shelf Life |
| 8 | Serving Ideas for Every Occasion |
| 9 | Common Mistakes to Avoid |
| 10 | Variations & Creative Twists |
| 11 | Make-Ahead & Freezing Guide |
| 12 | Nutrition & Portion Tips |
| 13 | Why Butterfinger Balls Are Crowd Favorites |
| 14 | Holiday & Party Planning Ideas |
| 15 | Final Thoughts |
1. Why You’ll Love Butterfinger Balls
Let’s be honest—we all need a go-to dessert that’s easy and impressive. Butterfinger Balls check every box:
No baking required
Minimal ingredients
Perfect for parties
Kid-friendly and adult-approved
They’re ideal for busy days when you want something homemade but don’t want to spend hours in the kitchen.
2. Ingredients Overview
Here are the exact ingredients you’ll need:
1 (16-oz) box powdered sugar
2½ cups graham cracker crumbs
5 (1.9-oz) Butterfinger bars, crushed
1¼ cups butter, melted
1½ cups crunchy peanut butter
1 (24-oz) package chocolate almond bark or preferred chocolate candy coating
Each ingredient plays a key role:
Powdered sugar adds sweetness and structure.
Graham cracker crumbs provide texture and balance.
Crushed Butterfinger bars bring that iconic crunch.
Melted butter binds everything together.
Crunchy peanut butter creates a rich, nutty base.
Chocolate coating seals it all with a smooth finish.
3. Preparation & Timing Details
Here’s what to expect time-wise:
Preparation Time: 20 minutes
Cook Time: 0 minutes (No baking required)
Chill Time: 30 minutes
Total Time: 50 minutes
Servings: Approximately 40–48 balls (depending on size)
In less than an hour, you’ll have a tray full of irresistible treats.
4. Step-by-Step Instructions
Step 1: Mix the Ingredients
Mix powdered sugar, graham cracker crumbs, crushed Butterfinger bits, melted butter, and peanut butter until combined.
Make sure everything is evenly blended. The mixture should be thick but moldable.
Step 2: Roll Into Balls
Roll mixture into 1-inch balls.
Keep them uniform so they chill and coat evenly.
Step 3: Refrigerate
Refrigerate for 30 minutes.
This helps them firm up and makes dipping easier.
Step 4: Dip in Chocolate
Melt chocolate coating, dip each ball, and place on parchment paper.
Use a fork to lift each ball out smoothly.
Step 5: Let Set
Allow chocolate to set before serving.
Once hardened, they’re ready to enjoy!
5. Pro Tips for Perfect Texture
Want bakery-level results? Keep these tips in mind:
Don’t skip chilling. It keeps the balls firm while dipping.
Use parchment paper for easy cleanup.
Work in batches if your kitchen is warm.
If the mixture feels too sticky, refrigerate it briefly before rolling.
6. Choosing the Right Chocolate
You can use chocolate almond bark or any preferred chocolate candy coating.
Why almond bark? It melts smoothly and sets quickly without tempering. If using regular chocolate, melt gently to avoid burning.
Think of the chocolate coating like the shell of a truffle—it should be smooth, glossy, and firm.
7. Storage & Shelf Life
Store your Butterfinger Balls in:
Airtight container
Refrigerator for up to 2 weeks
They can also sit at room temperature for a few hours during parties without issue.
8. Serving Ideas for Every Occasion
These treats are perfect for:
Holiday cookie trays
Birthday parties
Bake sales
Game nights
Potlucks
Serve them in mini cupcake liners for a polished look.
9. Common Mistakes to Avoid
Even simple recipes can go wrong. Avoid these pitfalls:
Skipping chill time
Overheating chocolate
Making balls too large
Not crushing Butterfingers finely enough
Texture is everything here.
10. Variations & Creative Twists
Want to get creative?
Drizzle white chocolate over the top.
Sprinkle crushed Butterfinger on the coating before it sets.
Add festive sprinkles for holidays.
Use dark chocolate coating for a richer flavor.
The base recipe stays the same—just have fun with the finishing touch.
11. Make-Ahead & Freezing Guide
Butterfinger Balls freeze beautifully.
Place in airtight container.
Freeze up to 3 months.
Thaw in refrigerator before serving.
They’re a lifesaver during busy holiday seasons.
12. Nutrition & Portion Tips
These are indulgent treats, so enjoy in moderation. Because they’re rich, one or two usually satisfy that sweet tooth.
Pro tip? Make smaller balls for bite-sized portions.
13. Why Butterfinger Balls Are Crowd Favorites
There’s something nostalgic about Butterfinger candy. When you turn that flavor into a homemade dessert, it feels both familiar and special.
The crunch, the peanut butter, the chocolate—it’s a trio that never disappoints.
14. Holiday & Party Planning Ideas
Planning ahead? Double the recipe and freeze half.
They look beautiful arranged in tiers or decorative trays. Add themed decorations for:
Christmas
Halloween
Valentine’s Day
Easter
They’re versatile and festive.
15. Final Thoughts
If you’re looking for a no-fuss dessert that delivers big flavor, Butterfinger Balls are your answer. They’re simple, delicious, and always a hit. Whether you’re making them for a holiday gathering or just because you’re craving something sweet, this recipe never fails.
Why settle for store-bought candy when you can make something even better at home?
FAQs About Butterfinger Balls
1. Can I use creamy peanut butter instead of crunchy?
Yes, but the texture will be smoother. Crunchy peanut butter adds extra bite.
2. How do I prevent chocolate from cracking?
Avoid drastic temperature changes. Let them set gradually at room temperature if possible.
3. Can I make Butterfinger Balls ahead of time?
Absolutely! They can be refrigerated up to 2 weeks or frozen for 3 months.
4. Do I need to temper the chocolate?
Not if using almond bark or candy coating. They’re designed for easy melting.
5. Why are my Butterfinger Balls too soft?
They may need more chilling time. Make sure measurements are accurate and mixture is fully combined.
Enjoy your homemade Butterfinger Balls!