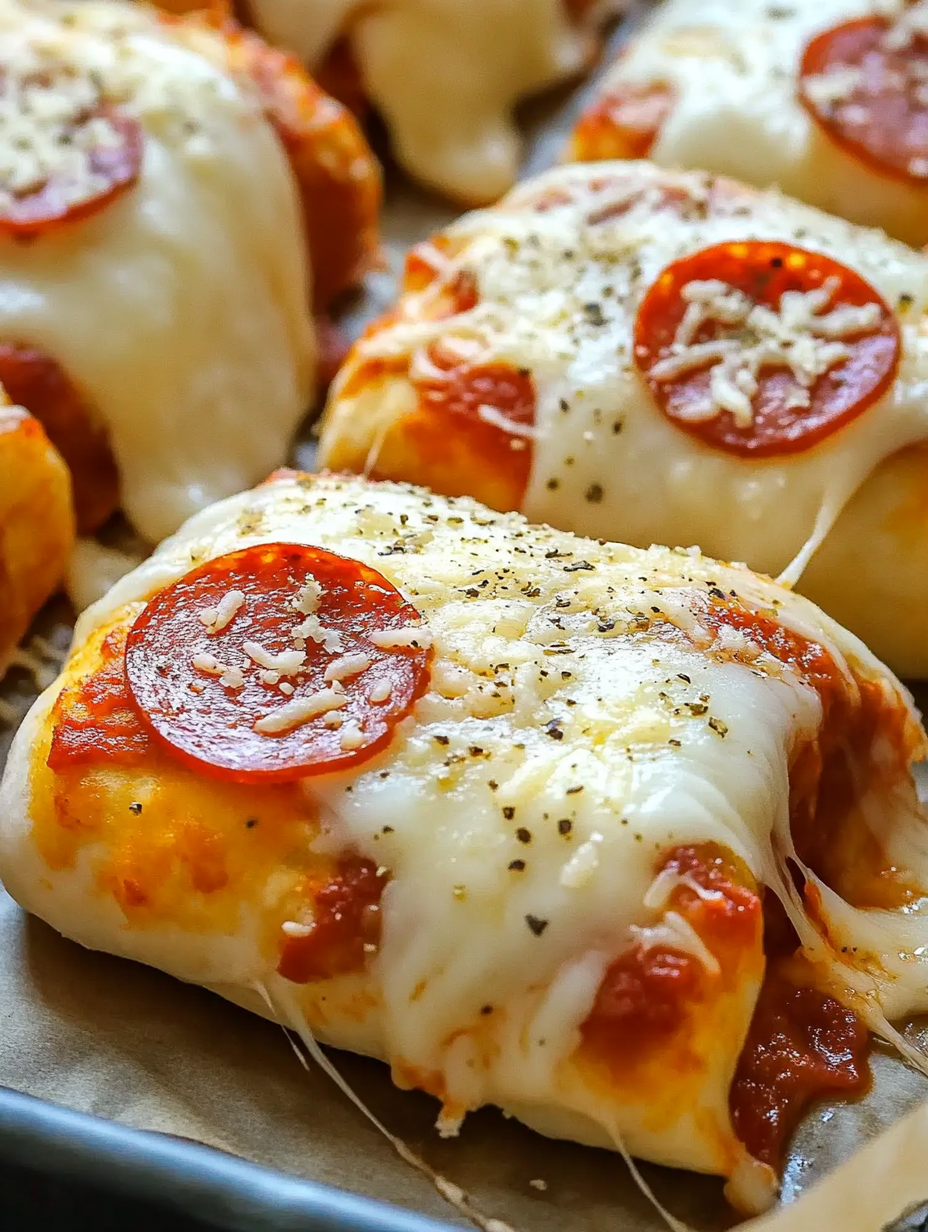
There’s something magical about warm, melty cheese wrapped inside golden bread. It’s the kind of comfort food that feels like a hug after a long day. If you love pizza but want something easier to grab, slice, and share, Cheesy Pepperoni Rolls are exactly what you need.
Think of them as pizza’s cozy cousin—rolled up, packed with flavor, and ready to steal the spotlight at parties, game nights, or even as a quick dinner. The best part? You don’t need fancy ingredients or complicated steps. Just a few simple staples and a little patience while the dough rises.
Ready to bake something amazing? Let’s dive in.
Table of Contents
| Sr# | Headings |
|---|---|
| 1 | Why You’ll Love Cheesy Pepperoni Rolls |
| 2 | Preparation Time, Cook Time & Servings |
| 3 | Ingredients You’ll Need |
| 4 | Kitchen Tools for Best Results |
| 5 | Step 1: Preparing the Dough |
| 6 | Step 2: Rolling Out the Dough |
| 7 | Step 3: Layering the Flavor |
| 8 | Step 4: Rolling and Shaping |
| 9 | Step 5: Baking to Golden Perfection |
| 10 | Step 6: Cooling and Serving |
| 11 | Pro Tips for Perfect Rolls |
| 12 | Serving Ideas and Pairings |
| 13 | Storage and Reheating Tips |
| 14 | Common Mistakes to Avoid |
| 15 | Why These Rolls Are Perfect for Any Occasion |
1. Why You’ll Love Cheesy Pepperoni Rolls
Let’s be honest—who doesn’t love cheese and pepperoni? These Cheesy Pepperoni Rolls combine everything you adore about pizza into a convenient, sliceable loaf.
They’re:
Easy to make
Family-friendly
Perfect for parties
Great for meal prep
Absolutely delicious
Plus, when that mozzarella melts and stretches with every bite, it feels like you’ve hit the comfort food jackpot.
2. Preparation Time, Cook Time & Servings
Here’s what you need to plan for:
Preparation Time: 15 minutes (plus thawing time for dough)
Cook Time: 15–25 minutes
Total Time: Approximately 2–3 hours (including dough thawing)
Servings: 6–8 slices per roll (1 roll per dough log)
Simple, right? Most of the time is hands-off while the dough thaws.
3. Ingredients You’ll Need
Keep it simple. No substitutions, no extras—just the essentials:
Frozen pizza dough
Pepperoni
Grated mozzarella
Parmesan cheese
Olive oil
Italian seasoning
1/4 cup tomato sauce
Garlic salt (optional)
That’s it. Basic ingredients that deliver big flavor.
4. Kitchen Tools for Best Results
Before you start, grab:
Rolling pin
Baking sheet
Plastic wrap
Pastry brush
Knife for slicing
Having everything ready makes the process smoother and more enjoyable.
5. Step 1: Preparing the Dough
Let It Thaw Properly
Loosely cover the frozen pizza dough with plastic wrap and allow it to thaw for a few hours at room temperature until slightly puffed up.
Tip: Spray or brush the plastic wrap with cooking oil to prevent sticking.
This step is crucial. If the dough isn’t fully thawed, it won’t roll out properly. Think of it like trying to bend a frozen stick—it just won’t cooperate.
6. Step 2: Rolling Out the Dough
Once thawed:
Roll the dough into an 11 x 11-inch square.
One frozen dough log makes one pepperoni roll.
Try to keep the thickness even so it bakes uniformly. Uneven dough can lead to undercooked centers or overbrowned edges.
7. Step 3: Layering the Flavor
Now comes the fun part—building those irresistible layers.
Brush with Olive Oil
Brush the dough with olive oil or your preferred cooking oil. This helps create a golden crust and enhances flavor.
Add Pepperoni
Lay pepperoni over the entire surface of the dough.
Add Mozzarella
Sprinkle shredded mozzarella cheese evenly over the dough.
Add Parmesan and Seasoning
Sprinkle with shredded Parmesan cheese and lightly sprinkle with Italian seasoning.
Add Garlic Salt (Optional)
For extra flavor, add a sprinkling of garlic salt.
Each layer adds depth. The mozzarella brings meltiness, Parmesan adds sharpness, and Italian seasoning ties everything together like a well-conducted orchestra.
8. Step 4: Rolling and Shaping
Roll the dough tightly starting from one edge of the square.
Make sure it’s snug—but not so tight that the filling squeezes out. Think of it like rolling a sleeping bag: firm, even, and secure.
Place the rolls on a baking sheet, leaving space between each roll.
Brush melted butter on top of the uncooked pepperoni rolls.
9. Step 5: Baking to Golden Perfection
Bake at 375°F for 15 to 25 minutes, until:
The top is golden brown
The crust is firm when tapped
Every oven is slightly different, so keep an eye on it after the 15-minute mark.
When you see that golden top, you’ll know it’s almost time to dig in.
10. Step 6: Cooling and Serving
Allow the pepperoni rolls to cool completely before slicing and serving.
Yes, waiting is hard. But slicing too soon can cause the cheese to ooze out everywhere. Letting them cool helps everything set beautifully.
Once cooled, slice and enjoy!
11. Pro Tips for Perfect Rolls
Want bakery-quality results?
Don’t skip thawing time.
Roll evenly.
Avoid overfilling.
Check at 15 minutes while baking.
Let them cool before slicing.
Small details make a big difference.
12. Serving Ideas and Pairings
Wondering how to serve your Cheesy Pepperoni Rolls?
Serve with extra 1/4 cup tomato sauce for dipping.
Pair with a simple green salad.
Add them to a game-day snack table.
Pack slices in lunchboxes.
They’re incredibly versatile. Whether casual or party-ready, they always fit in.
13. Storage and Reheating Tips
Have leftovers? Lucky you.
Storage
Store in an airtight container.
Keep in the fridge for up to 3 days.
Reheating
Oven: 350°F for 5–10 minutes.
Microwave: 20–30 seconds.
The oven keeps the crust crisp, while the microwave is quick and convenient.
14. Common Mistakes to Avoid
Even simple recipes can go wrong. Here’s what to watch for:
Rolling dough too thin
Not spacing rolls on baking sheet
Skipping cooling time
Baking at wrong temperature
Stick to the steps, and you’ll be just fine.
15. Why These Rolls Are Perfect for Any Occasion
Need a quick dinner? Done.
Hosting friends? Perfect.
Craving comfort food? Absolutely.
These Cheesy Pepperoni Rolls are like that reliable friend who always shows up when you need them. They’re easy, comforting, and guaranteed to disappear fast.
Conclusion
If you’ve been looking for a recipe that’s simple yet satisfying, these Cheesy Pepperoni Rolls check every box. They bring together gooey mozzarella, savory pepperoni, and golden bread in one irresistible bite.
The beauty of this recipe is its simplicity. No complicated techniques. No endless ingredient lists. Just honest, delicious food that brings people together.
So, what are you waiting for? Grab that dough and start rolling.
Enjoy!
FAQs
1. Can I prepare Cheesy Pepperoni Rolls ahead of time?
Yes! You can assemble the rolls, cover them tightly, and refrigerate for a few hours before baking.
2. Why is my dough shrinking when I roll it out?
It may not be fully thawed or rested. Let it sit a little longer at room temperature.
3. Can I freeze baked Cheesy Pepperoni Rolls?
Yes, wrap them tightly and freeze for up to 2 months. Reheat in the oven for best texture.
4. How do I keep the cheese from leaking out?
Avoid overfilling and roll the dough tightly but gently.
5. What’s the best way to slice the rolls neatly?
Allow them to cool completely and use a sharp serrated knife for clean cuts.
Now you’re fully equipped to make perfect Cheesy Pepperoni Rolls anytime you crave something warm, cheesy, and unforgettable.