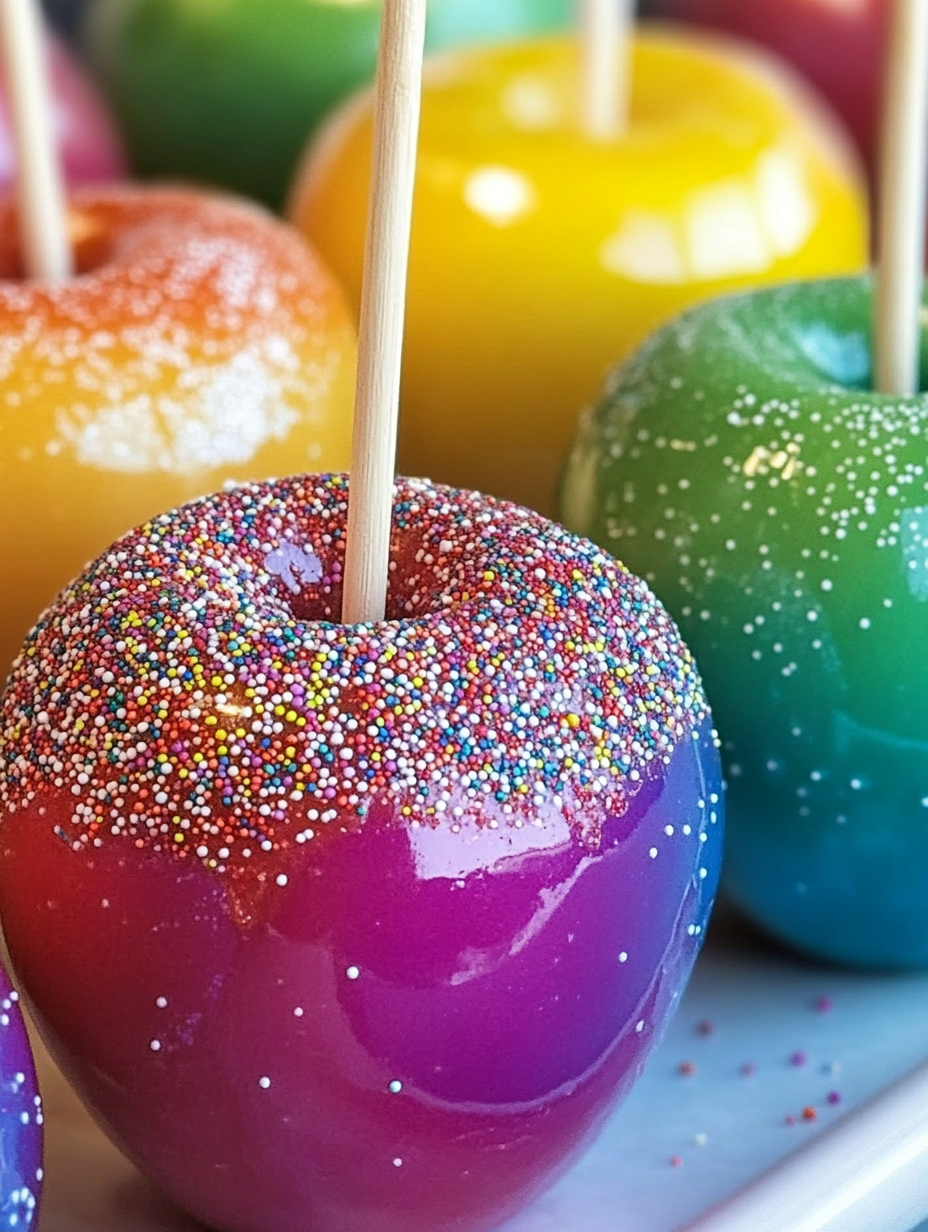
When it comes to classic, fun, and festive treats, Colorful Candy Apples are a must! Their bright, shiny appearance and sweet crunchy coating make them perfect for any occasion whether it’s Halloween, a birthday party, or just a sweet indulgence for yourself. In this article, we’ll guide you through the process of making these delightful treats at home with simple ingredients and clear steps. Whether you’re a novice or a seasoned cook, you’ll find the recipe easy to follow and packed with helpful tips to ensure your candy apples come out perfectly. Let’s dive in!
1. Introduction to Colorful Candy Apples
Candy apples have long been a beloved treat for kids and adults alike. With their vibrant colors and satisfying crunch, they appeal to both the eyes and the taste buds. But why stick to the traditional red? With this recipe, you’ll learn how to make Colorful Candy Apples that reflect your personality, favorite colors, or event theme. So, let’s get started on transforming these simple apples into a visual (and edible) masterpiece!
2. The Essential Ingredients
Before you start making your candy apples, gather the necessary ingredients. Here’s what you’ll need:
- 6 medium-sized apples (Granny Smith works best for a tart contrast to the sweet candy coating)
- 2 cups granulated sugar
- 1 cup water
- 1/2 cup light corn syrup
- Food coloring (choose your favorite colors!)
- Sprinkles or toppings (optional but fun)
- Wooden sticks (to hold the apples)
These simple ingredients come together to create a treat that’s as fun to make as it is to eat!
3. Preparation: Getting Your Apples Ready
Before you get to the candy-making part, you need to prep your apples. Thoroughly wash them to remove any wax coating, then dry them with a clean towel. Inserting the wooden sticks into the tops of the apples is easy—just make sure they’re firmly in place so the apples don’t slip when you dip them into the candy. This step is key to ensuring a mess-free candy-making experience.
4. Making the Candy Mixture
Now for the fun part—making the candy coating! Combine the sugar, water, and corn syrup in a medium-sized pot. Stir the mixture over medium heat until the sugar dissolves. Once everything is mixed, stop stirring and let the candy come to a boil.
Why the no-stirring rule? Stirring can cause sugar crystals to form, resulting in a gritty texture. By letting the mixture boil undisturbed, you’ll get a smooth, glassy coating that makes candy apples so appealing.
5. The Art of Coloring the Candy
Once the candy mixture reaches a rolling boil, it’s time to add the food coloring. You can stick to a single color or make each apple unique by dividing the mixture into separate bowls and adding different colors to each. Whether you go for traditional red, spooky black, or a vibrant rainbow, the choice is yours. Stir the color gently to ensure it’s evenly distributed.
Tip: Use gel-based food coloring for brighter, more intense colors!
6. Reaching the Perfect Candy Temperature
This is where the magic happens—cooking the candy mixture to the right temperature. For that signature candy apple crunch, you need the mixture to reach 300°F, also known as the “hard crack” stage. Use a candy thermometer for precision. If you don’t have one, no worries! You can test it by dropping a bit of the mixture into cold water. If it hardens instantly into a brittle thread, you’re ready to go.
7. Dipping the Apples
Now comes the moment of truth—dipping the apples! Remove the candy from heat and allow it to cool slightly. Then, carefully dip each apple into the hot mixture, twirling it to coat all sides evenly. Let any excess candy drip off before placing the apples on a baking sheet lined with parchment paper.
Pro Tip: Make sure the candy isn’t too hot when you dip the apples, or the coating might slide off.
8. Adding Toppings for Extra Fun
While the candy is still sticky, it’s time to add some toppings! Whether you prefer classic sprinkles, crushed nuts, or a drizzle of chocolate, the possibilities are endless. You can even go wild with shredded coconut, edible glitter, or tiny candies for a unique twist. This is your chance to let your creativity shine!
9. Cooling and Setting the Candy Apples
Once your apples are coated and decorated, place them on the prepared baking sheet and let them cool completely. The candy will harden as it cools, giving you that classic crunchy texture. Depending on the temperature and humidity, this can take anywhere from 30 minutes to an hour.
10. Tips for Storing Candy Apples
Candy apples are best enjoyed the day they’re made, but if you have leftovers, they can be stored at room temperature for up to two days. Wrap each apple individually in plastic wrap to keep the candy coating from becoming sticky. Avoid refrigerating them, as moisture can ruin the candy shell.
11. Variations and Creative Twists
Feel like spicing things up? You can try endless variations with this basic recipe. Here are a few ideas:
- Caramel Candy Apples: Add a layer of caramel before dipping the apples in candy.
- Chocolate-Dipped Apples: Use melted chocolate instead of candy coating for a different flavor.
- Multi-Colored Apples: Divide the candy mixture and use several food colors for a rainbow effect.
Let your imagination run wild!
12. Healthier Alternatives
If you want to enjoy candy apples but are mindful of your sugar intake, consider using natural sweeteners like honey or agave syrup in place of corn syrup and sugar. While the texture won’t be exactly the same, it’s a healthier way to indulge.
13. Common Mistakes to Avoid
Even with a simple recipe, a few common mistakes can ruin your candy apples:
- Not cleaning the apples properly: Any wax on the apples will prevent the candy from sticking.
- Overcooking the candy: Going over 300°F will result in burnt-tasting candy.
- Dipping apples when the candy is too hot: This can cause the coating to slide off or form bubbles.
By avoiding these pitfalls, you’ll have perfect apples every time!
14. Conclusion: A Fun Treat for Everyone
Whether you’re making them for a party or as a fun family activity, Colorful Candy Apples are a treat everyone can enjoy. Their eye-catching appearance and delicious flavor make them a perfect addition to any occasion. Plus, with endless variations and toppings, you can create a candy apple that’s truly your own. So why not give this classic treat a try today?
15. FAQs About Candy Apples
1. Can I make candy apples without a candy thermometer?
Yes! You can test the candy’s readiness by dropping a bit into cold water. If it hardens into brittle threads, it’s ready.
2. How long do candy apples last?
Candy apples are best eaten the day they’re made but can last up to two days if wrapped tightly and stored at room temperature.
3. What apples work best for candy apples?
Granny Smith apples are ideal because their tartness balances the sweetness of the candy.
4. Can I use natural food coloring?
Yes, you can use natural food colorings made from ingredients like beet juice or turmeric, though the colors may be less vibrant.
5. How can I avoid bubbles in the candy coating?
Allow the candy mixture to cool slightly before dipping the apples. Dipping while it’s too hot can cause bubbles to form.