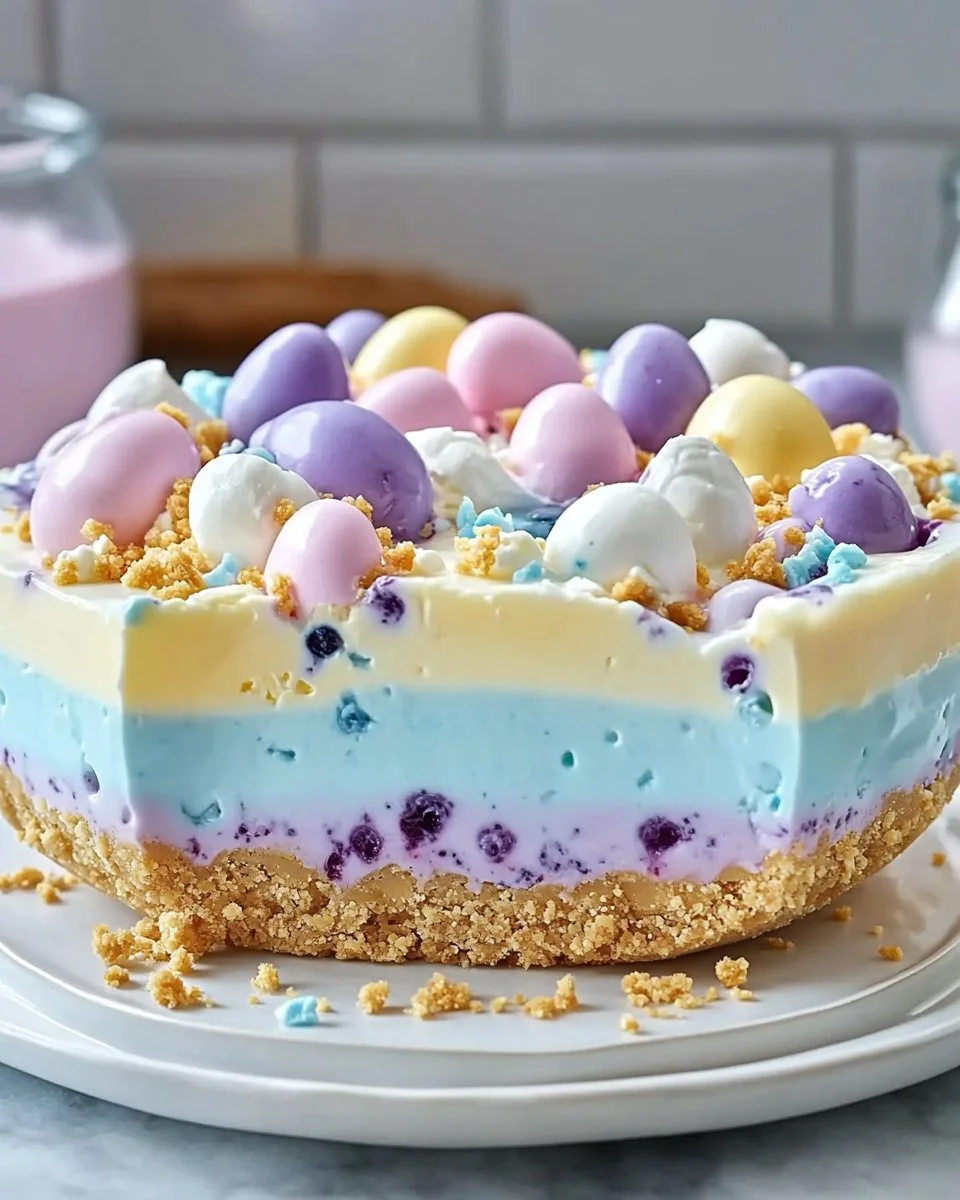
As the vibrant colors of spring start to unfurl, it’s the perfect time to whip up something delightful for your Easter celebrations. This Easter Jell-O Pie is not just a feast for the eyes; it’s also a delicious treat that captures the essence of the season. With its playful layers of Jell-O and creamy filling, it’s an exciting addition to any dessert table. Whether you’re hosting a family gathering or looking for a sweet surprise for the kids, this pie is sure to impress. Plus, it’s incredibly easy to make, requiring minimal ingredients and no baking. Let’s dive into the details!
What Makes This Recipe a Spring Favorite
This recipe shines for various reasons, making it a beloved choice during Easter and other holiday gatherings. First off, it’s incredibly simple, allowing even novice cooks to create an impressive dessert with ease. The vibrant colors of the Jell-O make for a visually stunning pie that catches the eye and piques interest. It’s also a budget-friendly option, using ingredients that are generally affordable and accessible. Additionally, the combination of fruity flavors and creamy texture offers a delightful contrast that your guests will love. Lastly, it’s a make-ahead dessert, which frees up your time on the day of your event for other preparations.
How This Dessert Comes Together
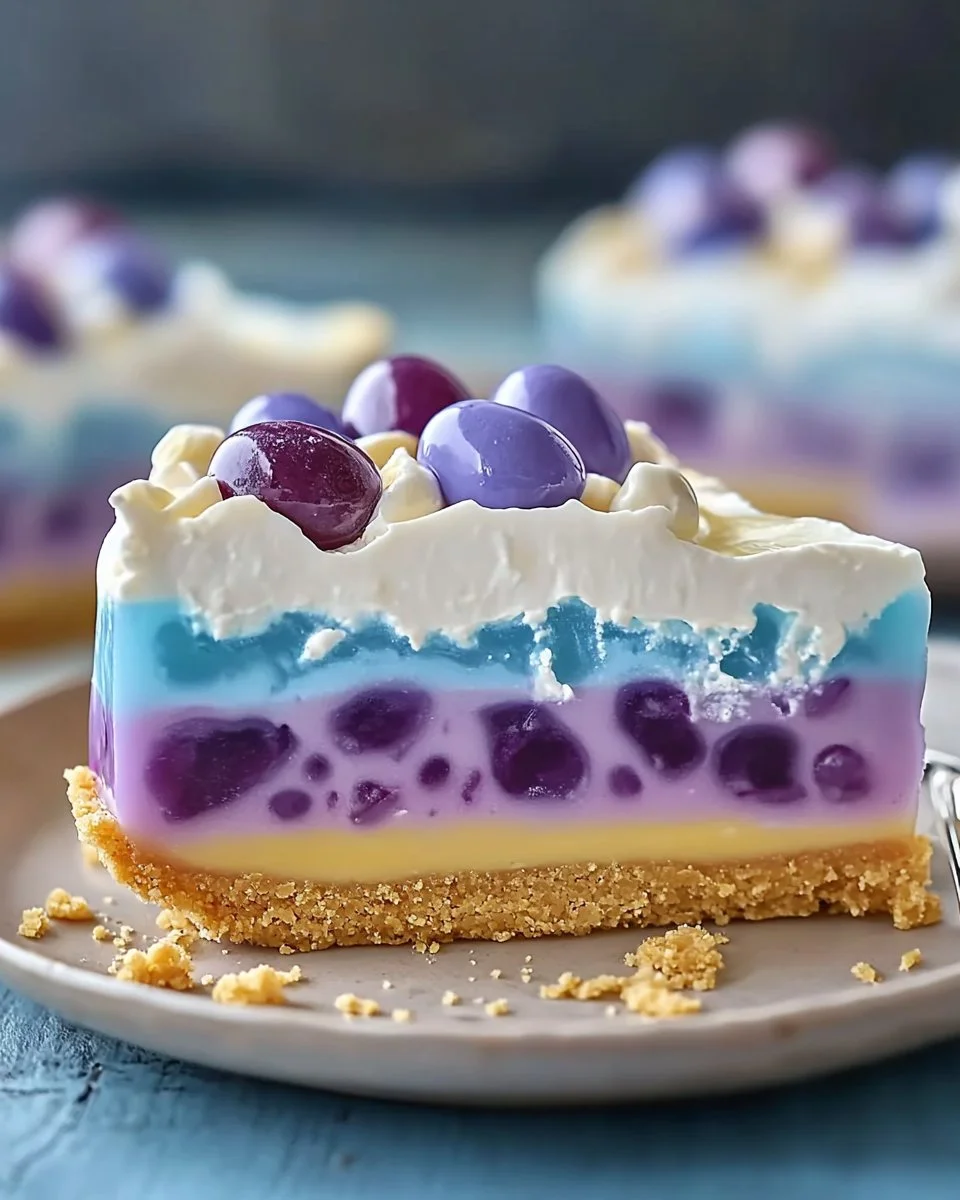
Creating this Easter Jell-O Pie is a straightforward process that involves layering your ingredients in a pre-made graham cracker crust. First, you’ll dissolve each flavor of Jell-O in boiling water, incorporating cold water to set the colors. Meanwhile, you’ll prepare a creamy mixture using softened cream cheese and whipped topping for a luscious filling. Once you have your Jell-O layers and creamy mixture ready, it’s just a matter of layering them beautifully in the crust. Allow each layer to set in the refrigerator, giving your pie a stunning multi-colored presentation. After a few hours of chilling, you’ll have a whimsical dessert that’s perfect for any festive occasion.
Ingredients
- 1 pre-made graham cracker crust
- 1 (3 oz) box lemon Jell-O
- 1 (3 oz) box grape Jell-O
- 1 (3 oz) box berry blue Jell-O
- 3 cups boiling water (1 cup per Jell-O flavor)
- 3 cups cold water (1 cup per Jell-O flavor)
- 8 oz cream cheese, softened
- 1 1⁄2 cups whipped topping
Each ingredient plays a vital role in achieving the delightful outcome of this pie. The pre-made graham cracker crust gives a sweet, crunchy base, while the Jell-O provides vibrant color and fruity flavors that are reminiscent of spring. Cream cheese adds richness and a creamy texture, perfectly balanced with the light and airy whipped topping.
Step-by-Step Instructions
- Prepare the Jell-O: In three separate mixing bowls, dissolve each flavor of Jell-O in 1 cup of boiling water. Stir until fully dissolved. Then, add 1 cup of cold water to each bowl, mixing well.
- Make the Cream Cheese Mixture: In another bowl, beat the softened cream cheese until it’s smooth and creamy. Make sure there are no lumps for the best texture.
- Add the Whipped Topping: Gently fold in the whipped topping into the cream cheese mixture until fully combined. This will create a light, fluffy filling.
- Layer the Mixtures: Begin by pouring one flavor of Jell-O into the graham cracker crust and refrigerate until set, usually about 30 minutes. Once set, add a layer of the cream cheese mixture and gently spread to cover the Jell-O. Continue layering with the next flavor of Jell-O, chilling each layer as you go.
- Final Chill: After you have added all layers, refrigerate the pie for at least several hours, or until firm. This will ensure each layer holds its shape when you slice the pie.
Be patient with the setting times; this ensures a clean cut when slicing your pie. You want to see distinct layers that showcase the beautiful colors!
Serving Suggestions for Your Festive Pie
Serving this Easter Jell-O Pie is a fun opportunity to get creative. You can simply slice it into wedges and place on dessert plates for individual servings. Consider garnishing with fresh fruit such as berries, which can enhance the fruity elements of the pie. A dollop of additional whipped cream on top adds an extra layer of indulgence.
This pie pairs wonderfully with a variety of beverages. A light and refreshing lemonade or iced tea can balance the sweetness, making your dessert experience even more enjoyable. It also serves as a delightful ending to a spring-themed brunch or lunch, where guests can have a light meal before diving into the sweetness.
Keeping Leftovers Fresh
If you happen to have leftovers, storing them properly is essential to maintain freshness. Cover the pie with plastic wrap or aluminum foil to prevent it from absorbing any odors from the fridge. It will stay fresh for up to 3 days when stored in the refrigerator.
If you wish to freeze portions for later enjoyment, slice the pie and wrap individual pieces tightly in plastic wrap, then store in an airtight container. This way, you can enjoy a slice of spring even after the holiday has passed. Just be mindful that the texture may slightly change upon thawing.
Helpful Tips for Success
When making this pie, here are a few practical tips to ensure your success:
- Use boiling water: Make sure the water is boiling when dissolving the Jell-O for the best results.
- Watch the setting times: Each layer needs to set adequately before adding the next. This creates clean, striking layers.
- Beat the cream cheese well: Ensure that it’s at room temperature so it blends easily with the whipped topping.
- Experiment with flavors: While we’ve stuck with a fruity theme, feel free to mix and match flavors that you enjoy!
Creative Twists on the Classic Recipe
If you’re looking to change up this classic recipe, there are many delicious variations you can explore:
- Fruit Additions: Add fresh or canned fruit in between layers for added texture and flavor. Sliced strawberries or kiwi would add a beautiful touch.
- Different Base: Instead of a graham cracker crust, try using an oreo crust for a chocolatey flavor.
- Use Sugar-Free Options: If you want a lighter dessert, substitute with sugar-free Jell-O and whipped topping.
Common Questions about This Recipe
1. Can I use a different type of crust?
Absolutely! You can try various crusts like an Oreo crust or even a cookie crust made from your favorite snacks.
2. How long does it take for the pie to set?
It typically takes at least 3-4 hours in the refrigerator to set completely, but it’s best to leave it overnight if you have time.
3. Is this recipe suitable for kids?
Yes! This pie is a fun and colorful treat that kids usually love. They can even help with the mixing and layering process.
4. Can I double the recipe?
Yes, you can double the ingredients and use a larger pan if you want to make more to serve a larger group.
5. What if I don’t have whipped topping?
You can make your own whipped cream by whipping heavy cream with a little sugar until it forms soft peaks. This can be a great homemade alternative!