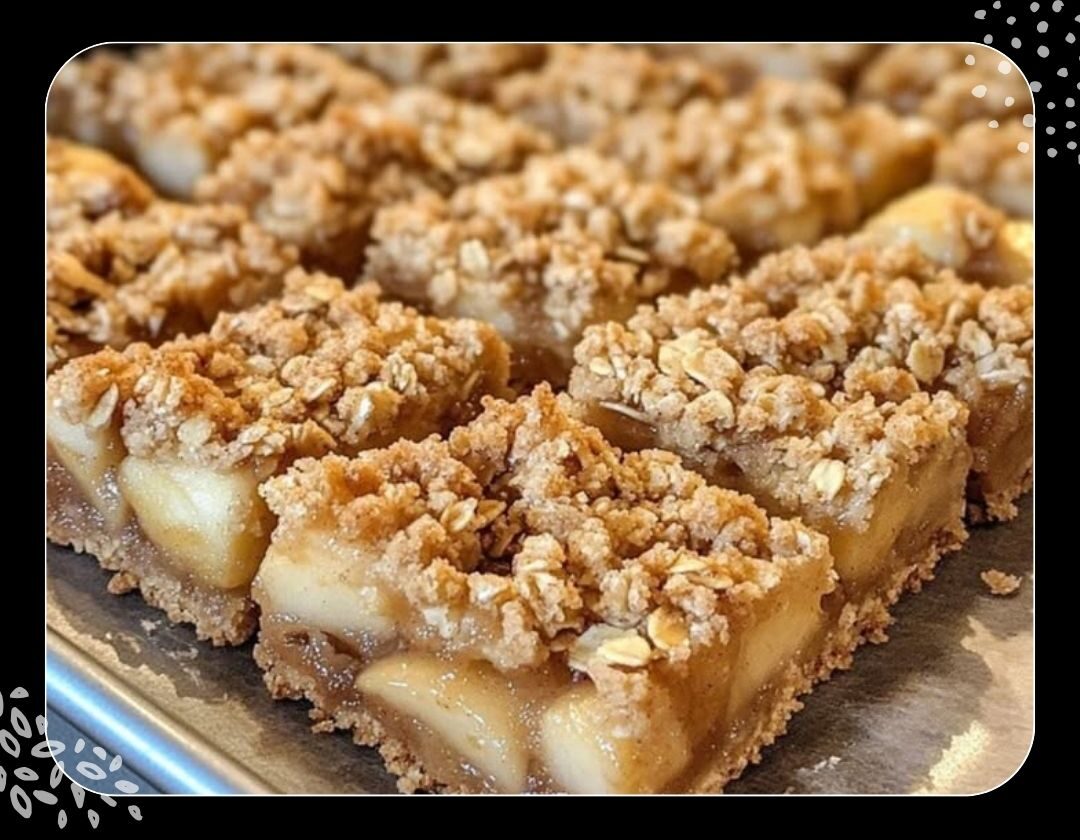
If you love desserts that are warm, comforting, and bursting with flavor, Easy Apple Crisp Bars are about to become your new favorite. Imagine the sweet aroma of cinnamon-spiced apples baking in the oven, layered over a buttery crust and topped with a golden, crunchy crumble. It’s like a cozy autumn hug—except you can eat it.
These bars are not just delicious; they’re incredibly easy to make. With simple pantry ingredients and a few fresh apples, you can whip them up in about an hour. Whether you’re hosting a fall gathering, looking for a potluck dessert, or simply craving a sweet homemade snack, this recipe will hit the spot every time.
1. Why You’ll Love Easy Apple Crisp Bars
These bars strike the perfect balance between sweet and tangy, soft and crunchy. The buttery crust holds up beautifully, while the apples stay juicy and flavorful under that golden oat topping. Plus, this recipe is foolproof—no complicated baking skills required.
Think of them as the easier, handheld cousin of the classic apple pie. You get all the flavors you love without the fuss of rolling out pie dough.
2. Ingredients You’ll Need
Here’s everything you’ll need to make 12 delicious bars:
For the crust:
1 cup (120g) all-purpose flour
½ cup (100g) brown sugar, packed
½ cup (115g) unsalted butter, melted
For the apple filling:
4 medium apples, peeled, cored, and diced
2 tablespoons granulated sugar
1 tablespoon all-purpose flour
½ teaspoon ground cinnamon
¼ teaspoon ground nutmeg
For the crumble topping:
1 cup (90g) rolled oats
½ cup (60g) all-purpose flour
½ cup (100g) brown sugar, packed
½ cup (115g) unsalted butter, melted
3. Choosing the Best Apples
When it comes to Easy Apple Crisp Bars, the apples you choose make a big difference. Granny Smith apples are a classic pick for their tartness, which pairs well with the sweet topping. For a sweeter bite, go for Honeycrisp, Fuji, or Gala apples.
Tip: Mixing two varieties can give your bars a more complex flavor.
4. Step-by-Step Instructions
Preheat your oven to 350°F (175°C) and line an 8×8-inch baking pan with parchment paper.
Make the crust: Mix flour, brown sugar, and melted butter until a dough forms. Press evenly into the pan and bake for 10 minutes.
Prepare the filling: Toss diced apples with sugar, flour, cinnamon, and nutmeg.
Layer the filling: Spread apple mixture evenly over the crust.
Make the topping: Mix oats, flour, brown sugar, and melted butter until crumbly. Sprinkle evenly over apples.
Bake for 30-35 minutes until the topping is golden and apples are tender.
Cool completely before cutting into squares.
5. Making the Buttery Crust
The crust serves as the foundation for your bars. The combination of flour, brown sugar, and melted butter creates a rich, shortbread-like base that stays firm but tender. Press it firmly into the pan to ensure it holds together when sliced.
6. Preparing the Apple Filling
The filling is where the magic happens. Coating the apples with sugar, flour, and spices not only enhances flavor but also helps thicken the juices during baking. The cinnamon and nutmeg bring that classic fall aroma that makes your kitchen smell heavenly.
7. Crafting the Perfect Crumble Topping
The topping combines oats for chewiness, flour for structure, brown sugar for sweetness, and butter for richness. When baked, it turns into a golden, crispy layer that contrasts beautifully with the soft apples underneath.
8. Baking Tips for Perfect Results
Always pre-bake the crust—this prevents sogginess.
Dice apples evenly for consistent texture.
Don’t overbake; you want the topping golden, not burnt.
9. Cooling and Cutting for Clean Squares
Patience is key here. Let the bars cool completely before slicing—this allows the filling to set, making clean cuts possible. Use a sharp knife and wipe it between cuts for neat edges.
10. Serving Suggestions
These bars are wonderful as-is, but for an indulgent twist, serve them warm with a scoop of vanilla ice cream or a drizzle of caramel sauce.
11. How to Store Easy Apple Crisp Bars
Store in an airtight container at room temperature for up to 2 days, or refrigerate for up to 5 days. They taste just as good the next day—if not better.
12. Freezing and Reheating Tips
Wrap bars individually in plastic wrap and freeze for up to 3 months. To reheat, pop them in the oven at 300°F (150°C) for 10 minutes or until warmed through.
13. Variations and Flavor Twists
Add chopped pecans or walnuts to the topping for extra crunch.
Swap apples for pears for a different fall flavor.
Add a handful of dried cranberries for a tangy twist.
14. Common Mistakes to Avoid
Using too much liquid—this can make the bars soggy.
Skipping the parchment paper—removing the bars will be much harder without it.
Overmixing the topping—keep it crumbly for the best texture.
15. Final Thoughts
Easy Apple Crisp Bars are proof that sometimes the simplest recipes are the most satisfying. With their buttery crust, spiced apple filling, and crunchy topping, they’re a treat worth making again and again.
FAQs
1. Can I make Easy Apple Crisp Bars ahead of time?
Yes! They store well and taste even better after the flavors meld overnight.
2. Can I use quick oats instead of rolled oats?
You can, but the texture will be softer and less chewy.
3. What’s the best way to cut clean slices?
Let the bars cool completely and use a sharp knife, wiping it between cuts.
4. Can I make these gluten-free?
Yes—swap the all-purpose flour for a gluten-free flour blend and use certified gluten-free oats.
5. Can I double the recipe?
Absolutely! Use a 9×13-inch pan and adjust baking time as needed.