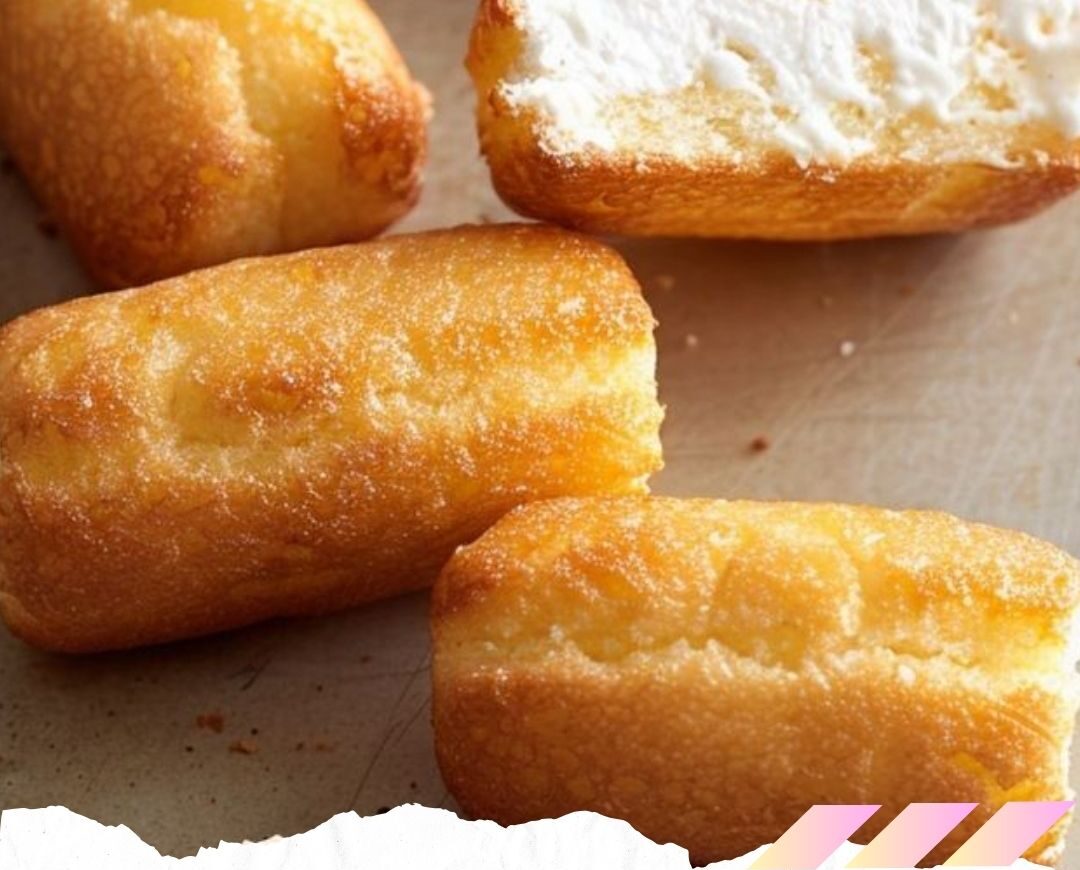
Making Homemade Twinkies is like taking a nostalgic bite straight from childhood—but better, because you’re making them fresh in your own kitchen. Imagine fluffy, golden sponge cakes filled with a creamy, cloud-like vanilla filling. If you’ve ever wondered how to recreate this iconic treat at home, you’re in the right place.
In this detailed guide, we’ll walk through ingredients, step-by-step instructions, tips, tricks, and everything you need for perfect Homemade Twinkies every time.
1. Introduction to Homemade Twinkies
Homemade Twinkies bring together comfort, nostalgia, and sheer deliciousness. Instead of relying on packaged versions, making them at home allows you to enjoy fresher, fluffier, and more flavorful treats. Think of it like upgrading from a bus ride to a personal chauffeur—same goal, entirely different experience.
2. Why Make Twinkies at Home?
Store-bought Twinkies are fun, but Homemade Twinkies are something special.
Here’s why people love making them:
You control the flavor and sweetness.
No preservatives—just fresh ingredients.
They taste richer and creamier.
It’s a fun baking project for all ages.
Plus, who doesn’t love impressing friends with a homemade version of a classic snack?
3. Ingredients Needed
Below are the exact ingredients you will need. These must be kept exactly as provided:
For the Twinkies:
1 cup all-purpose flour
1 1/2 teaspoons baking powder
1/4 teaspoon salt
4 large eggs, separated
1 cup granulated sugar
1/4 cup unsalted butter, melted
2/3 cup milk
1 teaspoon vanilla extract
For the Filling:
1/2 cup vegetable shortening
1/2 cup unsalted butter, softened
2 cups powdered sugar
2 teaspoons vanilla extract
These basic ingredients come together to create that classic, irresistible Twinkie flavor.
4. Essential Tools You’ll Need
You don’t need fancy equipment, but a few tools make the process easier:
Twinkie baking pan or mini loaf pans
Piping bag with round tip
Mixing bowls
Electric mixer
Cooling racks
Spatula
These tools help you achieve the signature shape, texture, and filling style.
5. Prep Time, Cook Time, and Servings
Prep Time: 20 minutes
Cook Time: 12–15 minutes
Total Time: 35 minutes
Servings: About 12 Homemade Twinkies
Quick, easy, and worth every minute.
6. Step-by-Step Instructions for Homemade Twinkies
Here are the original instructions exactly as provided, followed by expert-level explanations:
Instructions:
Preheat your oven to 350°F (175°C). Grease and flour a Twinkie pan or mini loaf pans.
In a medium bowl, whisk together the flour, baking powder, and salt. Set aside.
In a large mixing bowl, beat the egg yolks and granulated sugar together until pale and thick.
Stir in the melted butter, milk, and vanilla extract until well combined.
Gradually add the dry ingredients to the wet ingredients, mixing until just combined.
In a separate clean bowl, beat the egg whites until stiff peaks form.
Gently fold the beaten egg whites into the batter until no streaks remain.
Divide the batter evenly among the prepared pans, filling each about two-thirds full.
Bake in the preheated oven for 12 to 15 minutes, or until a toothpick inserted into the center comes out clean.
Remove the cakes from the oven and let them cool in the pans for 5 minutes before transferring them to wire racks to cool completely.
For the filling: In a medium mixing bowl, beat the vegetable shortening and softened butter together until smooth.
Gradually add the powdered sugar, beating until light and fluffy.
Stir in the vanilla extract until well combined.
Assembly: Once the cakes are completely cooled, use a piping bag fitted with a round tip to inject the filling into each cake through three holes on the bottom.
Serve immediately or store in an airtight container at room temperature.
Enjoy!
7. Understanding the Batter
This batter is similar to a sponge cake.
By separating the eggs and whipping the whites into stiff peaks, you introduce air that creates the soft, fluffy texture Twinkies are known for. When folding in the whites, be gentle—think of folding a blanket over a sleeping baby. Too much force and you’ll deflate the batter.
8. Perfecting the Filling
The filling is creamy, smooth, and lightly sweet—exactly what Twinkie lovers crave.
Key tips:
Butter and shortening must be soft, not melted
Add powdered sugar slowly for smoothness
Beat until almost whipped-cream light
This filling is what makes Homemade Twinkies truly irresistible.
9. Baking Tips for the Best Texture
Do not overmix the batter after adding egg whites
Fill the pans only two-thirds to prevent overflow
Rotate the pan halfway through baking if your oven heats unevenly
Your Twinkies should come out golden, springy, and lightly domed.
10. Cooling and Handling Your Cakes
Let your cakes cool completely before filling.
Warm cakes will cause the filling to melt and create soggy centers. Use a gentle touch when removing them from the pan—these cakes are delicate like little pillows.
11. How to Fill Your Twinkies Properly
To get the classic three-holes filled look:
Insert the piping tip at the bottom.
Squeeze gently until you feel the cake inflate slightly.
Repeat in three evenly spaced spots.
Don’t overfill or the cake may burst.
12. Storage and Shelf Life
Homemade Twinkies don’t last as long as store-bought versions (because they lack preservatives), but that’s a good thing.
Room Temperature: 2 days
Refrigerator: 5 days
Freezer: Up to 2 months
Always store in airtight containers to keep them soft.
13. Flavor Variations to Try
Want to experiment? Try these fun twists:
Chocolate-filled Twinkies (add cocoa)
Strawberry cream filling
Banana-flavored sponge
Caramel swirl filling
Homemade Twinkies are easy to customize to your favorite flavors.
14. Common Mistakes to Avoid
Overmixing the batter
Not greasing the pan well
Using melted (instead of softened) butter for the filling
Filling the cakes before they cool
Adding filling too forcefully
Avoiding these mistakes ensures perfect results every time.
15. Final Thoughts
Homemade Twinkies are delicious, nostalgic, and surprisingly simple to make. Whether you’re baking them for kids, guests, or just treating yourself, this recipe brings the magic of classic snack cakes right to your kitchen. With fluffier cake and fresher filling than anything store-bought, you’ll never look at packaged Twinkies the same way again.
FAQs
1. Can I make Homemade Twinkies without a Twinkie pan?
Yes! Mini loaf pans or even cupcake molds work fine. The shape may differ, but the flavor stays spot on.
2. Why did my Twinkies come out dense instead of fluffy?
You may have overmixed the batter or deflated the egg whites. Fold gently for a lighter texture.
3. Can I replace the shortening in the filling?
You can use all butter, but shortening gives that classic Twinkie flavor and stability.
4. How do I prevent the filling from leaking out?
Inject slowly and avoid overfilling. Make sure the cakes are fully cooled.
5. Can Homemade Twinkies be frozen?
Absolutely—they freeze very well. Just thaw at room temperature before serving.