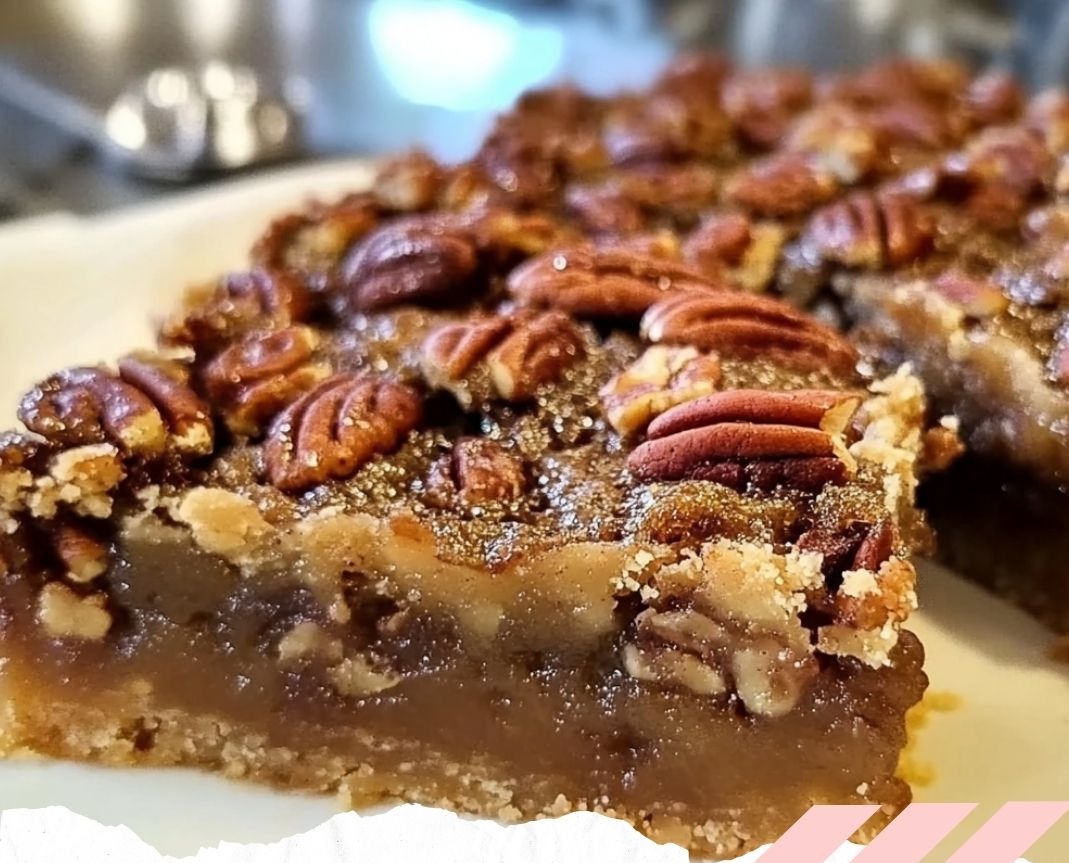
Ever find yourself craving pecan pie but dreading the thought of rolling out dough, measuring sticky syrup, and watching the oven like a hawk? Same here. That’s where Lazy Girl Pecan Pie Bars come to the rescue. They’ve got all the rich, gooey, nutty goodness of a pecan pie—without the hassle.
These bars are for those of us who love desserts but don’t love complicated steps. It’s like making a five-star dessert while still in your pajamas. Ready to impress without the stress? Let’s dive in.
1. Ingredients You’ll Need
Let’s keep it simple. No need to run to a gourmet store—you likely have most of this in your kitchen already.
For the Crust:
1 cup unsalted butter, melted
½ cup granulated sugar
2 teaspoons vanilla extract
2 cups all-purpose flour
For the Pecan Filling:
¾ cup brown sugar, packed
½ cup corn syrup (light or dark)
¼ cup unsalted butter, melted
2 large eggs, beaten
1 teaspoon vanilla extract
¼ teaspoon salt
1 ½ cups chopped pecans
2. Why You’ll Love Lazy Girl Pecan Pie Bars
Think of these bars as the shortcut to Southern hospitality. They taste like grandma spent all day baking, but only take you about an hour start to finish.
You get:
The buttery shortbread crust that holds everything together.
A sweet, nutty pecan filling with just the right gooeyness.
Minimal cleanup and zero stress.
It’s dessert magic, minus the magic wand.
3. Tools & Prep Tips
You don’t need fancy equipment. Here’s all you’ll need:
9×13-inch baking dish
Parchment paper or non-stick spray
Mixing bowls
Whisk and spoon
Prep Tip: Lining your baking dish with parchment makes cleanup—and slicing—a breeze. It’s like using a cheat code.
4. Step-by-Step: The Crust
This buttery base is basically a shortbread dream.
Mix melted butter, sugar, vanilla, and flour in a bowl.
Press the mixture evenly into your prepared pan.
Bake for 15 minutes at 350°F (175°C), or until the edges are lightly golden.
You want it just set—not too brown—since it’ll bake again with the filling.
5. Step-by-Step: The Pecan Filling
Here’s where the magic happens.
In a bowl, whisk together brown sugar, corn syrup, melted butter, eggs, vanilla, and salt.
Once smooth, fold in your chopped pecans.
That’s it. Told you it was lazy-girl approved.
6. Assembling the Bars
Time to layer up!
Pour the pecan filling directly over the warm crust. This helps everything meld together beautifully.
Use a spatula to spread it evenly so every bite gets that gooey topping.
7. Baking Tips for a Perfect Texture
Bake at 350°F (175°C) for 25–30 minutes.
How to tell they’re done? The center should be set but still have a slight jiggle—kind of like Jell-O on a trampoline.
Let them sit in the turned-off oven for a couple minutes if the middle seems too wet.
8. Cooling and Cutting Without the Mess
This is the hardest part: waiting.
Cool the bars completely—about 1 hour—before cutting.
Use a sharp knife, and wipe it clean between cuts for those perfect bakery-style squares.
The filling firms up as it cools, so resist the urge to dig in too soon.
9. Flavor Variations to Try
Want to mix it up? Here are some fun twists:
Chocolate Drizzle: Melt a little dark chocolate and zigzag it over the top after cooling.
Maple Magic: Swap corn syrup with pure maple syrup for a deeper flavor.
Bourbon Boost: Add 1 tablespoon of bourbon to the filling for a grown-up twist.
10. Serving Ideas
These bars are super versatile. Serve them:
With a scoop of vanilla ice cream
On a holiday dessert table
As a sweet brunch addition
With coffee for an indulgent mid-afternoon treat
They’re basically the little black dress of desserts—works anywhere, anytime.
11. Storing and Freezing Tips
Room Temp: Keep in an airtight container for up to 3 days.
Fridge: Lasts up to a week.
Freezer: Freeze in layers with parchment paper in between. Stays good for 2–3 months.
Just thaw at room temperature before serving.
12. When to Serve These Bars
There’s really no wrong time, but they’re especially great for:
Thanksgiving when you want pie without the work
Potlucks where you want to wow without the effort
Bake sales because these practically sell themselves
Lazy weekends when baking is optional but dessert is not
13. Make-Ahead Hacks for Busy Days
Want to plan ahead?
Bake and freeze: Make the whole batch and freeze it.
Make the crust ahead: Mix and press into the pan, then refrigerate until ready to bake.
Perfect for when you want dessert, but also want to nap.
14. Troubleshooting Common Mistakes
Filling too runny?
You might’ve underbaked it or added too much syrup. Next time, bake until just jiggly, not liquid.
Crust too dry?
Make sure you’re using melted—not softened—butter and press it firmly into the pan.
Topping cracked?
Overbaking is likely the culprit. Remember: set, but jiggly.
15. Final Thoughts
Lazy Girl Pecan Pie Bars are the ultimate no-fuss, high-reward dessert. Whether you’re baking for a crowd or just treating yourself, these bars are a sweet shortcut to happiness. They’re buttery, nutty, chewy, and just plain addictive.
Go ahead, bookmark this recipe and make it your go-to for every sweet emergency.
FAQs
1. Can I use a different type of nut instead of pecans?
Yes! Walnuts or almonds work well, but the flavor will be slightly different. Pecans give that classic Southern taste.
2. Do Lazy Girl Pecan Pie Bars need to be refrigerated?
Not necessarily. They’re fine at room temperature for a couple of days but can be refrigerated to extend freshness.
3. Can I make this recipe gluten-free?
Absolutely. Just swap the all-purpose flour with your favorite 1:1 gluten-free blend.
4. What’s the best way to cut perfect squares?
Let the bars cool completely, use a sharp knife, and wipe it clean between cuts. A warm knife can help with cleaner edges.
5. Can I double the recipe for a larger crowd?
Yes! Just use a larger baking dish or make two batches. Adjust baking time as needed and keep an eye on the filling.
If you’ve ever wanted pecan pie without the commitment, Lazy Girl Pecan Pie Bars are your new best friend. Happy baking—and even happier snacking!


