Welcome to our deep dive into the world of Lemon Cream Cheese Bars! In this article, we’ll explore every aspect of crafting these irresistible treats—from the exact ingredients to the secrets behind a perfect texture and tang. If you love a mix of creamy, zesty, and crunchy, then this recipe is sure to captivate your taste buds. We’ll share step-by-step guidance, insightful tips, and creative twists so you can confidently create a dessert that stands out at any gathering. Whether you’re a seasoned baker or just starting out, these bars are designed to delight with their balanced flavors and charming presentation. Ready to experience a symphony of flavors where every ingredient plays its part? Let’s get started on this delicious journey!
Below, you’ll find a detailed Table of Contents that will guide you through every step of our recipe, ensuring you never miss an important tip or trick for making your Lemon Cream Cheese Bars absolutely perfect.
1. Understanding the Ingredients
Every great recipe starts with the perfect ingredients, and our Lemon Cream Cheese Bars are no exception. Let’s break down what you’ll need:
For the Crust:
- 1 ½ cups graham cracker crumbs (about 10–12 sheets, crushed)
- ¼ cup granulated sugar
- 6 tablespoons unsalted butter, melted
For the Filling:
- 2 (8 oz) packages cream cheese, softened to room temperature
- ½ cup granulated sugar
- 2 large eggs, room temperature
- Zest and juice of 2 lemons (about ¼ cup fresh juice)
- 1 teaspoon vanilla extract
For Garnish (Optional):
- Powdered sugar (for dusting)
- Fresh berries (such as raspberries, blueberries, or sliced strawberries)
Each component in this recipe plays a crucial role. The graham cracker crust provides a sturdy, slightly sweet base with a satisfying crunch. The cream cheese filling is luxuriously smooth and pairs beautifully with the tangy, refreshing kick of lemon. And finally, the garnish not only adds visual appeal but can enhance the flavor profile, depending on your choice. Understanding these ingredients will help you appreciate the balance and care that goes into making each bite as delightful as possible.
2. Preheating and Preparing the Oven
Before you embark on your baking adventure, it’s essential to preheat your oven to the right temperature. Preheating ensures that every ingredient bakes evenly and reaches its full flavor potential. For our recipe, set your oven to 350°F (175°C). This moderate temperature is ideal for gently melting the butter in the crust and slowly cooking the cream cheese mixture without over-browning or drying it out.
Next, you’ll want to prepare your baking pan. We recommend using an 8×8-inch baking pan. Line the pan with parchment paper, making sure to leave an overhang on the sides. This simple step makes it much easier to lift the finished bars out of the pan once they’ve cooled. Think of this process like setting the stage before a performance; by taking the time to properly preheat and prepare your equipment, you’re ensuring that the “show”—or in this case, your dessert—goes off without a hitch.
Have you ever noticed how a well-prepared stage can set the tone for an unforgettable performance? Your baking pan is no different; the right preparation means your Lemon Cream Cheese Bars will not only taste amazing but also look professionally finished.
3. Creating the Perfect Crust
The crust is the unsung hero of our dessert—a foundation that holds the creamy filling while providing a contrasting crunch. In this step, you’ll mix the graham cracker crumbs, sugar, and melted butter until the combination resembles wet sand. This texture is key, as it will help the crust hold together and become firm once baked.
Why is the crust so important? Imagine a building with a weak foundation; even the most spectacular design could crumble. Similarly, a solid, well-made crust ensures that your Lemon Cream Cheese Bars will have the perfect balance of textures. Press the mixture firmly into the bottom of your prepared pan using either the back of a spoon or your hands. The goal here is to create an even, tightly packed layer that will bake into a delicious, sturdy base.
Once your crust is evenly pressed, pop it into your preheated oven for 8–10 minutes until it turns a light golden color. This step not only sets the crust but also enhances its flavor by toasting the graham cracker crumbs ever so slightly. The aroma that fills your kitchen during these few minutes is sure to get you excited for what’s coming next!
4. Preparing the Cream Cheese Filling
While your crust is baking, it’s time to prepare the star of our recipe—the cream cheese filling. This component is where the magic of creaminess meets the vibrant tang of lemon. Start by placing the softened cream cheese and ½ cup granulated sugar into a large mixing bowl. Using an electric mixer or a sturdy whisk, beat these ingredients together until the mixture is smooth, creamy, and free of lumps. This should take about 2–3 minutes.
The smooth consistency of the filling is vital; it ensures that each bite melts in your mouth, creating a delightful contrast with the crisp crust. Once your cream cheese mixture is perfectly blended, add the eggs one at a time, beating thoroughly after each addition. This gradual process helps incorporate air into the mixture, lending a light, airy texture to the final product.
The addition of eggs is a crucial step, as they serve as a binding agent that holds the filling together during baking. Just like a good story needs a solid narrative, your Lemon Cream Cheese Bars need this binding element to bring everything together harmoniously.
5. The Magic of Lemon Zest and Juice
Now comes the moment when the true personality of our dessert is revealed—the lemon zest and juice. Adding the zest and juice of two lemons brings a burst of freshness and a tang that perfectly complements the rich cream cheese filling. The zest carries the essential oils of the lemon, providing an intense citrus flavor, while the juice offers a bright, refreshing acidity.
Mix in the lemon zest and the ¼ cup of fresh lemon juice along with 1 teaspoon of vanilla extract into your cream cheese mixture. This combination transforms the filling into something uniquely vibrant. The vanilla adds a subtle layer of warmth, balancing the sharp citrus notes without overpowering them.
Imagine the process like painting with flavors: the lemon represents a bold, bright color, while the vanilla provides a soft, complementary shade. Together, they create a masterpiece of taste that is as pleasing to the eye as it is to the palate. This step is where you can truly personalize your Lemon Cream Cheese Bars—if you love an extra citrus punch, feel free to adjust the quantities slightly to match your taste.
6. Assembling the Bars
With both the crust and the filling prepared, it’s time to bring everything together. Carefully remove your slightly cooled crust from the oven and ensure it has firmed up just enough to support the filling. Pour the cream cheese mixture over the crust, using a spatula to spread it out evenly. This step is reminiscent of assembling a puzzle—every piece must fit perfectly to create the complete picture of your dessert.
Take your time with this step; a smooth, evenly distributed filling is key to achieving uniform Lemon Cream Cheese Bars. The layered structure not only looks appealing when cut into squares but also guarantees that every bite has a balanced ratio of creamy filling to crunchy crust.
If you’re someone who enjoys seeing the fruits of your labor come together seamlessly, this step is particularly satisfying. The visual transformation from a simple pan of ingredients into a layered, gourmet dessert is both exciting and rewarding.
7. Baking to Perfection
Now that your pan is filled with the luscious cream cheese mixture sitting atop the golden crust, it’s time to bake! Place your pan back into the oven and bake for 25–30 minutes. The key here is to watch the edges; they should be set while the center remains slightly jiggly. This delicate balance ensures that the filling will firm up perfectly as it cools, while still retaining a smooth and creamy texture.
Baking is as much an art as it is a science. It’s similar to tuning a fine instrument—each minute counts and can affect the final harmony of flavors and textures in your Lemon Cream Cheese Bars. Be sure to avoid overbaking, as this can result in a dry or cracked surface. Instead, aim for that ideal moment when the center is just a bit soft, promising the creamy delight that awaits after the cooling period.
The aroma that fills your kitchen during this stage is nothing short of enchanting. As the bars bake, you’re greeted with a comforting blend of buttery crust and tangy lemon essence that builds anticipation for the final product.
8. Cooling and Setting Process
Once your bars are done baking, it’s crucial to let them cool completely in the pan on a wire rack. The cooling process allows the filling to set properly, ensuring that your Lemon Cream Cheese Bars can be neatly cut into squares without crumbling apart. Patience is key here; although it might be tempting to dive right in, waiting at least 2–3 hours in the refrigerator guarantees the best texture and flavor.
Think of the cooling period as the grand finale of a symphony. Every note has been played, and now it’s time for the performance to settle, leaving behind a lasting impression. In our case, the cool-down phase gives the filling time to firm up and marry the flavors together, resulting in a dessert that is both cohesive and delectable.
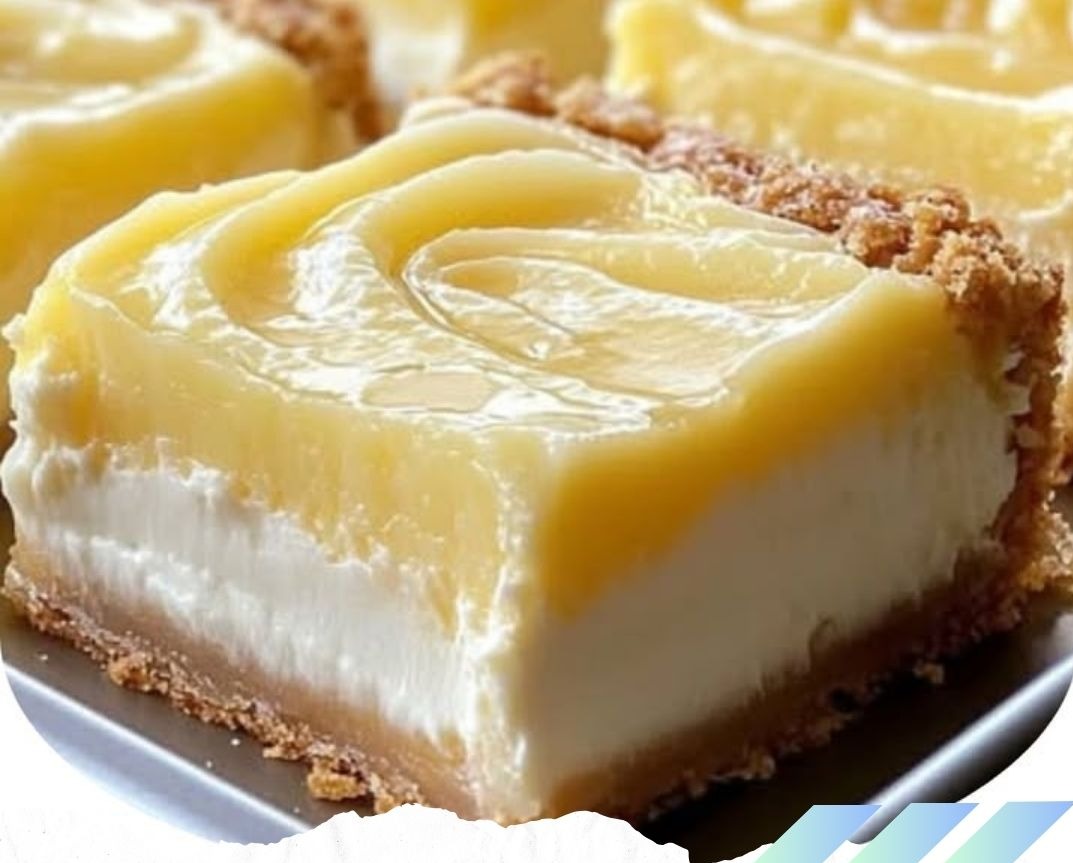
Once chilled, use the parchment paper overhang to gently lift the entire block out of the pan. This careful removal is the final step before you get to enjoy your masterpiece. Cutting the bars with a sharp knife ensures clean, precise edges that look as beautiful as they taste.
9. Garnishing Your Lemon Cream Cheese Bars
Presentation is everything, and garnishing your Lemon Cream Cheese Bars can take them from delicious to dazzling. While the bars are scrumptious on their own, a light dusting of powdered sugar adds a touch of elegance. Alternatively, you can adorn them with fresh berries—raspberries, blueberries, or sliced strawberries—for a burst of color and an extra layer of flavor.
Garnishing is not just about looks; it’s an opportunity to add another dimension to the taste experience. Imagine a painter adding final brush strokes to a nearly finished masterpiece—each detail enhances the overall effect. With a sprinkle of powdered sugar or a handful of fresh berries, your dessert becomes a work of edible art, perfect for impressing guests or simply treating yourself to a gourmet delight.
Take a moment to experiment with different garnishing styles. Some bakers even drizzle a light lemon glaze over the top for an extra tang, or add a mint leaf for a refreshing hint of flavor. The choice is yours, and each option promises to elevate your Lemon Cream Cheese Bars to a new level of sophistication.
10. Serving Suggestions and Pairings
How you serve your Lemon Cream Cheese Bars can make all the difference. These treats are versatile and pair wonderfully with a variety of beverages and accompaniments. For a relaxed afternoon treat, serve them with a hot cup of coffee or tea—the creamy, citrusy bars complement the rich, robust flavors of your favorite brew.
If you’re hosting a brunch or a light dessert course, consider pairing the bars with a chilled glass of sparkling lemonade or even a crisp white wine. The tangy lemon in the bars resonates with the citrus notes in these drinks, creating a harmonious flavor profile that is sure to impress your guests.
Another fun serving idea is to cut the bars into bite-sized pieces for a party platter. This makes them easy to share and perfect for mingling, much like small works of art that invite conversation and admiration. Remember, the way you present your Lemon Cream Cheese Bars not only enhances their visual appeal but also sets the mood for a delightful culinary experience.
11. Tips and Tricks for Success
Even the best recipes benefit from a few insider tips. Here are some tried-and-true techniques to ensure your Lemon Cream Cheese Bars turn out perfectly every time:
- Room Temperature Ingredients: Make sure your cream cheese, eggs, and butter are at room temperature before mixing. This ensures a smoother, more homogenous filling.
- Mixing Techniques: Beat the cream cheese and sugar well until completely smooth. A few extra minutes of mixing can make a significant difference.
- Even Distribution: When pressing the crust and spreading the filling, take your time to ensure even distribution. This guarantees that every bar has the perfect balance of crust and filling.
- Baking Watch: Keep a close eye on your bars during baking. Remember, the center should be just slightly jiggly for the perfect texture.
- Chilling Time: Don’t rush the cooling process. The bars need time to set in the refrigerator for at least 2–3 hours to achieve the desired consistency.
These simple tips are like secret ingredients in a recipe—they elevate your baking from ordinary to extraordinary and help you consistently achieve delectable results.
12. Common Mistakes and How to Avoid Them
Even experienced bakers can encounter pitfalls, but with a little know-how, you can sidestep common mistakes and enjoy flawless Lemon Cream Cheese Bars every time. Here are a few common issues and ways to prevent them:
- Overbaking: One of the most frequent errors is leaving the bars in the oven too long. Overbaking can cause the edges to become dry and the center to lose its creamy texture. Always aim for a slightly jiggly center.
- Undermixing the Filling: If the cream cheese isn’t mixed thoroughly with the sugar and eggs, you might end up with a lumpy filling. Take your time during this stage to ensure a smooth consistency.
- Improper Cooling: Cutting the bars too soon can result in crumbling. Patience is key—always allow the dessert to cool completely and chill in the fridge.
- Inconsistent Crust: Failing to press the crust firmly into the pan may lead to an uneven base. Use your hands or a flat tool to create a compact layer.
- Excessive Garnish: While garnishes add flair, too much can overpower the delicate flavors of the bars. Keep it light and balanced.
By avoiding these mistakes, you ensure that each bite of your Lemon Cream Cheese Bars is as delightful as the last.
13. Creative Variations to Try
Once you’ve mastered the classic recipe, don’t be afraid to experiment with creative variations. After all, cooking is an art, and every artist loves to add a personal touch. Here are a few ideas to spark your imagination:
- Citrus Medley: Add a bit of orange or lime zest along with the lemon for a more complex citrus flavor.
- Herbal Infusion: A hint of fresh basil or mint finely chopped into the filling can introduce an unexpected and refreshing twist.
- Nutty Crunch: For extra texture, consider mixing in a handful of finely chopped toasted almonds or pistachios into the crust.
- Glaze It Up: Drizzle a light lemon glaze over the top before serving to enhance the tangy flavor and add a shiny finish.
- Mini Bars: Use a mini muffin tin to create individual servings that are perfect for parties or a grab-and-go treat.
These variations allow you to tailor the recipe to your personal taste while keeping the core essence of Lemon Cream Cheese Bars intact. Experimenting in the kitchen can be as fun as painting a picture—each variation is a new brush stroke in your culinary masterpiece.
14. Nutritional Insights and Enjoyment
While indulging in delicious desserts like Lemon Cream Cheese Bars is a treat, it’s always helpful to have some nutritional insights. These bars combine the rich creaminess of cream cheese with the refreshing zing of lemon, providing a balanced blend of fats, sugars, and vitamins. Although they are best enjoyed as an occasional indulgence, you can still appreciate the quality of the ingredients.
For those who are mindful of their diet, consider these tips:
- Portion Control: Cutting the bars into smaller squares can help manage portion sizes.
- Ingredient Quality: Opt for high-quality cream cheese and fresh lemons to maximize both flavor and nutritional value.
- Balancing Act: Enjoy your dessert alongside a light meal or a cup of herbal tea to create a balanced culinary experience.
The nutritional value of these bars might not make them a health food, but they are a reminder that sometimes, life’s simple pleasures come in the form of a well-crafted dessert. And isn’t that what makes cooking such an art? It’s not just about nourishment, but about creating moments of joy and satisfaction.
15. Conclusion
In summary, our journey through the making of Lemon Cream Cheese Bars has been as refreshing as the dessert itself. From understanding the precise ingredients and the importance of a well-prepared crust to mastering the art of a smooth, tangy filling, each step is designed to bring out the best in this delightful treat. With patience, creativity, and a few insider tips, you’re now equipped to create bars that not only satisfy your sweet tooth but also impress friends and family alike. Enjoy the process, savor the flavors, and remember that every great dessert starts with a passion for quality ingredients and a love for the art of baking.
Frequently Asked Questions (FAQs)
Q1: Can I substitute the graham cracker crumbs in the crust?
Absolutely! While graham cracker crumbs are traditional and provide the perfect balance of sweetness and crunch, you can experiment with other crushed cookies or digestive biscuits if you prefer a different flavor profile. Just ensure they are finely crushed for a consistent texture.
Q2: What should I do if my cream cheese filling turns out lumpy?
Lumpy filling can often be remedied by ensuring that all ingredients are at room temperature before mixing. If lumps persist, try using an electric mixer on a lower speed for a longer period or pass the mixture through a fine sieve. Consistent mixing is key!
Q3: How can I tell if my bars are baked perfectly?
Look for set edges with a center that remains slightly jiggly. The center will firm up as it cools. Overbaking can lead to a dry texture, so it’s better to err on the side of caution and let the residual heat finish the cooking process during cooling.
Q4: Can I add other flavors to the filling?
Yes, you can experiment with additional flavors like a splash of orange extract or a sprinkle of cinnamon for a unique twist. Just remember to maintain the balance between the tangy lemon and the creamy filling.
Q5: How long can I store the Lemon Cream Cheese Bars?
These bars are best enjoyed within 3-4 days when stored in an airtight container in the refrigerator. For extended freshness, consider freezing individual portions and thawing them before serving.
By following these detailed steps and tips, you’re now ready to create your own batch of irresistible Lemon Cream Cheese Bars that will charm any dessert lover. Enjoy every step of the process and don’t be afraid to experiment with your own creative twists. Happy baking and bon appétit!