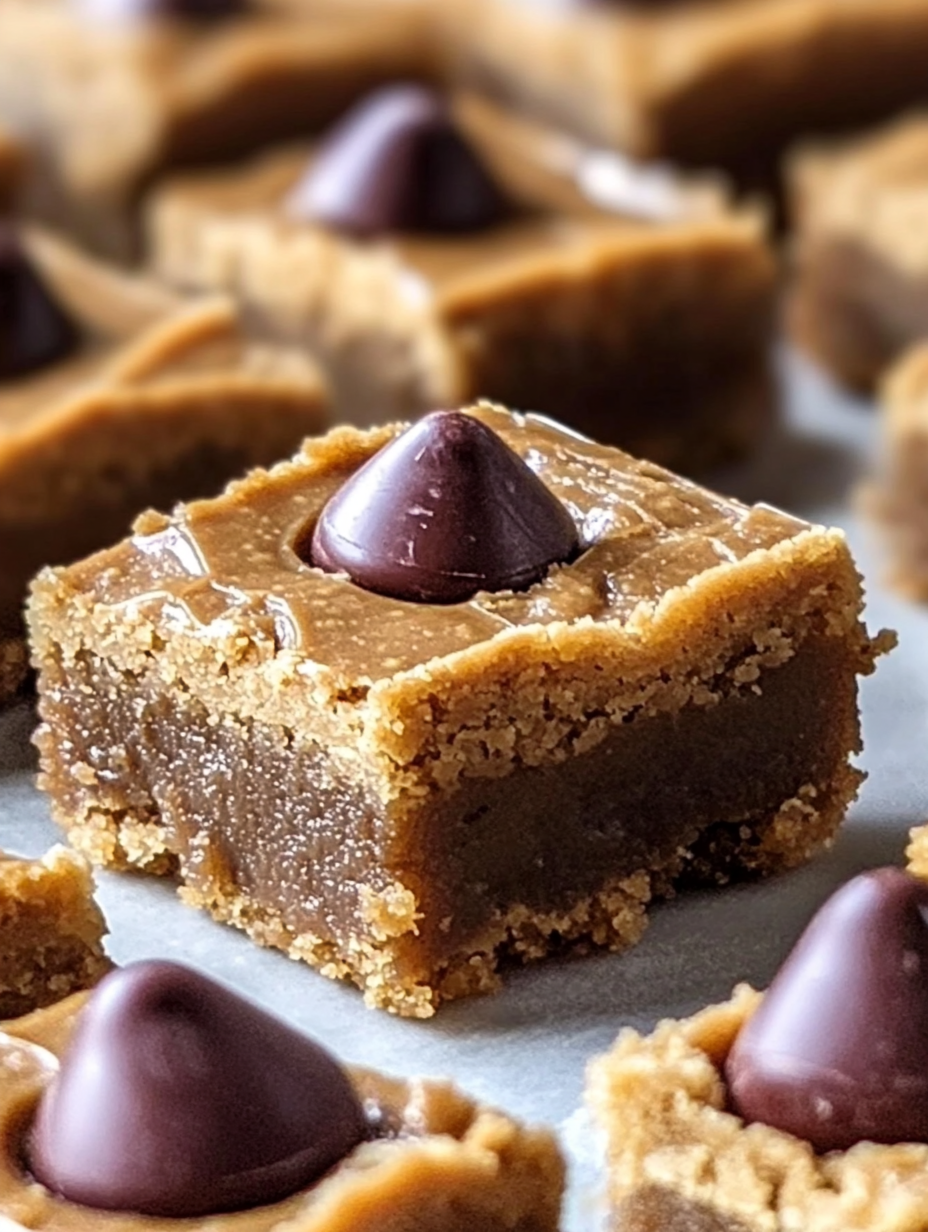
Few desserts hit the sweet spot quite like Peanut Butter Blossom Bars. These bars take the classic flavor of peanut butter blossoms—those iconic cookies with a chocolate Hershey’s Kiss on top—and transform them into bar form. Imagine a soft, chewy, peanut butter base with gooey chocolate melting into each bite. If you love peanut butter and chocolate, these bars are about to become your new favorite treat!
In this article, I’ll walk you through everything you need to know about Peanut Butter Blossom Bars, from ingredients and preparation to pro tips that’ll make you a baking pro. Whether you’re making them for the first time or perfecting your technique, this guide has you covered.
1. Introduction to Peanut Butter Blossom Bars
If you’re a fan of the traditional Peanut Butter Blossoms, then you’re in for a treat with this easy twist. Instead of individually shaping cookies, we’re simplifying the process by making bars, so all the deliciousness comes together in a much faster and convenient way. Peanut Butter Blossom Bars are perfect for gatherings, family events, or whenever you’re craving that unbeatable combination of peanut butter and chocolate.
Why This Recipe is a Must-Try
This recipe keeps all the classic flavors intact while making the preparation a breeze. With just one pan and a few simple steps, you can have a batch of soft and chewy bars ready to go. They’re perfect for novice bakers but will impress even the most experienced dessert lovers.
2. Why You’ll Love These Bars
Perfect for Peanut Butter Lovers
If you love peanut butter, these bars are for you. The peanut butter base is creamy, rich, and balanced perfectly with a touch of sweetness.
Chocolate Lovers Rejoice
Who doesn’t love chocolate and peanut butter together? Each bar is topped with a Hershey’s Kiss, making every bite a delicious explosion of flavors.
Easy to Make
You don’t need to be a baking expert to pull off these Peanut Butter Blossom Bars. With a straightforward recipe and minimal steps, these bars are a no-fuss dessert that anyone can make.
3. Key Ingredients
To make the perfect batch of Peanut Butter Blossom Bars, you’ll need:
- 1 cup all-purpose flour – The foundation of the bars.
- 1/2 teaspoon baking soda – Helps the bars rise slightly.
- 1/4 teaspoon salt – Balances the sweetness and enhances flavor.
- 1/2 cup unsalted butter, softened – Adds richness and moisture.
- 3/4 cup creamy peanut butter – The star ingredient.
- 1/2 cup granulated sugar – Sweetens the bars.
- 1/2 cup packed brown sugar – Adds a deeper caramel-like sweetness.
- 1 large egg – Binds the ingredients together.
- 1 teaspoon vanilla extract – Enhances flavor.
- 2/3 cup milk chocolate chips – For that melty chocolate goodness.
- 24 Hershey’s Kisses – The iconic finishing touch.
4. Step-by-Step Recipe Instructions
Prep the Oven
Preheat your oven to 350°F (177°C) and grease a 9×13-inch baking pan. Setting up early ensures the bars bake evenly and don’t stick.
Mix the Dry Ingredients
In a small bowl, whisk together the flour, baking soda, and salt. This ensures all your dry ingredients are evenly distributed before mixing them with the wet ingredients.
Cream the Butters and Sugars
In a larger bowl, beat the softened butter and peanut butter until smooth and creamy. Add the granulated and brown sugars, then beat until light and fluffy. This step is key to ensuring the bars have a soft, tender texture.
Add the Egg and Vanilla
Mix in the egg and vanilla extract until well combined. The egg helps bind the ingredients together, while the vanilla gives a warm flavor note.
Combine Wet and Dry Ingredients
Gradually add the dry ingredients to the wet mixture, mixing until just combined. Be careful not to overmix, as this can lead to tougher bars.
Fold in Chocolate Chips
Gently fold in the milk chocolate chips. You want to distribute them evenly throughout the dough for consistent chocolatey bites.
Bake the Bars
Press the dough into your prepared baking pan, spreading it out evenly. Bake for 20-22 minutes, or until the edges are golden brown and a toothpick inserted in the center comes out clean.
Add Hershey’s Kisses
Once the bars are out of the oven, gently press a Hershey’s Kiss into the top of each bar while still hot. The heat from the bars will slightly melt the chocolate, making them even more irresistible.
Cool and Slice
Allow the bars to cool completely in the pan before slicing into squares. This ensures they hold their shape and are easy to cut.
5. How to Perfect the Peanut Butter Base
The key to a good Peanut Butter Blossom Bar lies in the texture of the peanut butter base. You want it soft, chewy, and slightly crumbly without being dry. To achieve this, make sure you don’t overbake your bars. The edges should be golden brown, but the center should remain soft.
6. The Magic of Hershey’s Kisses
What sets Peanut Butter Blossom Bars apart is the Hershey’s Kisses on top. Make sure to press them into the bars as soon as they come out of the oven so they melt slightly and adhere to the surface. You can experiment with different flavors of Hershey’s Kisses like caramel, dark chocolate, or almond for a fun twist.
7. Tips for a Chewy and Soft Texture
- Don’t Overmix: Once you’ve added the dry ingredients, mix just until everything is combined. Overmixing can make the bars tough.
- Check Your Baking Time: Keep a close eye on the bars while they bake. You want them soft and chewy, not dry and overcooked.
- Use Creamy Peanut Butter: This will give your bars a smoother, more uniform texture compared to chunky peanut butter.
8. Customizing Your Peanut Butter Blossom Bars
While the classic version is always a hit, there are several ways you can customize your Peanut Butter Blossom Bars:
- Swap the Chocolate Chips: Use white chocolate, dark chocolate, or even peanut butter chips for a unique twist.
- Add a Nutty Crunch: Stir in some chopped peanuts or almonds to give the bars extra texture.
- Use Different Kisses: Experiment with caramel-filled, mint, or almond Hershey’s Kisses to change up the flavor.
9. Storing and Freezing the Bars
Storing
You can store Peanut Butter Blossom Bars in an airtight container at room temperature for up to five days. This keeps them soft and fresh.
Freezing
To freeze, place the bars in a single layer in an airtight container or wrap them individually in plastic wrap. They’ll keep in the freezer for up to three months. When ready to eat, just let them thaw at room temperature.
10. Troubleshooting Common Issues
Bars are Too Crumbly?
This might be due to overbaking. Next time, bake for a slightly shorter time and check the bars for doneness a minute or two early.
Bars are Too Dense?
If your bars turn out dense, it could be due to overmixing the batter. Make sure to mix just until the ingredients are combined.
11. Frequently Asked Questions (FAQs)
1. Can I use chunky peanut butter instead of creamy?
Yes, you can, but the texture of the bars may be slightly different. Chunky peanut butter will add some crunch to the bars, which some people love!
2. Can I substitute butter with margarine or another fat?
While you can use margarine, it may slightly change the texture and flavor. Butter is preferred for its rich taste and consistency.
3. How do I keep the Hershey’s Kisses from melting too much?
Press the Hershey’s Kisses into the bars immediately after baking, but let the bars cool completely before handling to prevent too much melting.
4. Can I make these bars gluten-free?
Yes! You can substitute the all-purpose flour with a gluten-free flour blend. Make sure it’s a 1:1 replacement designed for baking.
5. What’s the best way to cut these bars cleanly?
Let the bars cool completely before cutting. Use a sharp knife, and wipe the blade between cuts for clean edges.
Now that you’re armed with all the knowledge to make these irresistible Peanut Butter Blossom Bars, it’s time to bake! Enjoy the delicious combination of peanut butter and chocolate in every soft and chewy bite.