Introduction
Have you ever tasted something so luxuriously creamy and nutty that it made you close your eyes and sigh in delight? That’s exactly what a Pistachio Cheesecake feels like. It’s not just a dessert — it’s an experience, a perfect marriage between velvety cream cheese and the earthy, buttery taste of pistachios.
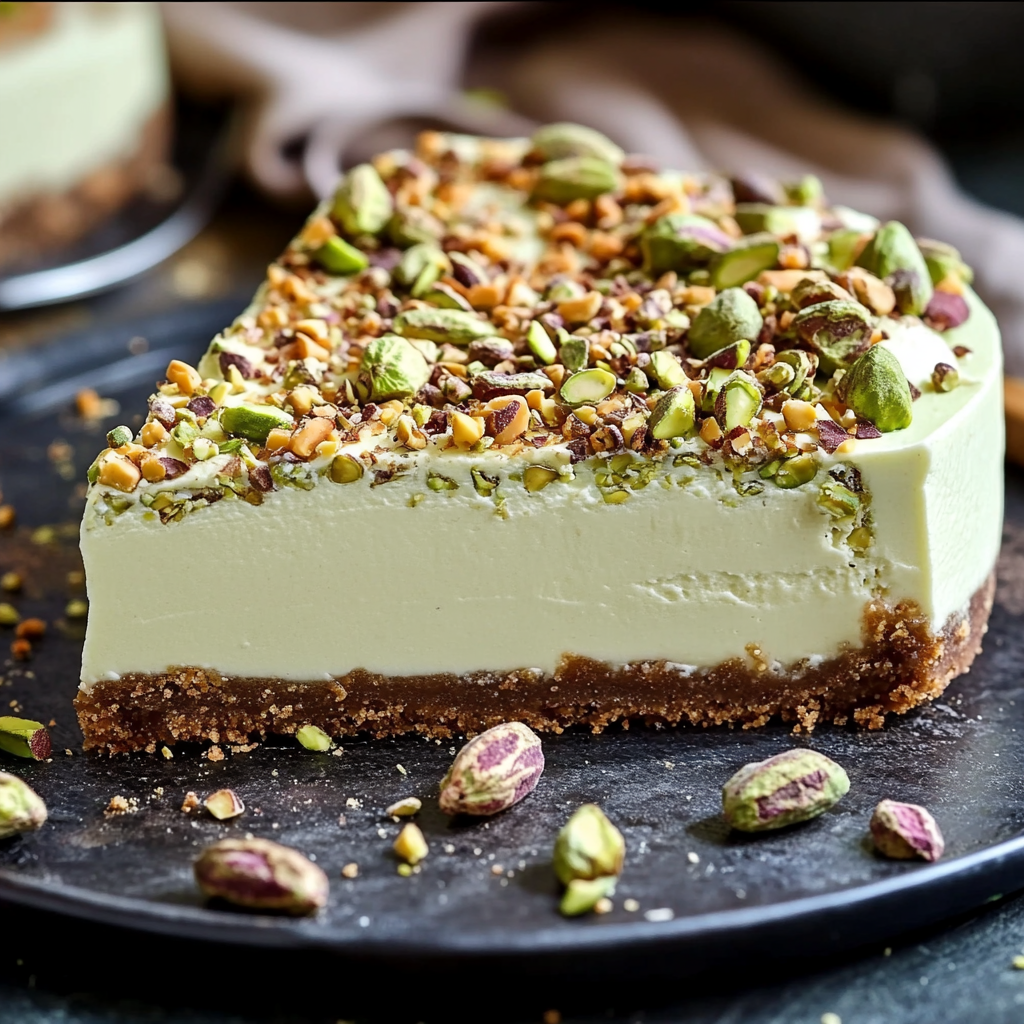
Imagine a smooth cheesecake filling resting on a crunchy graham-pistachio crust, topped with a silky pistachio cream. Sounds heavenly, right? Whether you’re making it for a holiday, a dinner party, or simply to treat yourself, this Pistachio Cheesecake will impress anyone who takes a bite.
1. What Makes Pistachio Cheesecake So Special
There’s cheesecake, and then there’s Pistachio Cheesecake — a masterpiece that combines the classic creamy flavor of cheesecake with the distinct nuttiness of pistachios. The balance of textures and flavors makes it unforgettable.
Pistachios don’t just add color; they bring richness and depth that elevate this dessert to gourmet level. It’s like the cheesecake version of fine jewelry — elegant, delicate, and full of character.
2. Essential Ingredients for the Perfect Cheesecake
Before you start, let’s talk about the essentials. Cheesecake is all about balance — between creamy and firm, sweet and nutty, light and rich. Each ingredient plays an important role. Missing one can throw off the entire texture or flavor.
So gather everything before you begin — baking is, after all, part science and part art.
3. Ingredients Breakdown: Crust, Filling & Topping
Here’s everything you’ll need to create this luxurious Pistachio Cheesecake masterpiece.
For the Crust:
1 1/2 cups graham cracker crumbs
1/4 cup granulated sugar
1/2 cup unsalted pistachios, finely ground
1/2 cup unsalted butter, melted
For the Filling:
24 ounces cream cheese, softened
1 cup granulated sugar
3 large eggs
1 cup sour cream
1 teaspoon vanilla extract
1/2 cup pistachio paste or finely ground pistachios
For the Pistachio Cream Topping:
1/2 cup heavy cream
1/4 cup powdered sugar
1/4 cup pistachio paste or finely ground pistachios
Chopped pistachios, for garnish
4. Step-by-Step Instructions
Follow these steps carefully, and your Pistachio Cheesecake will turn out beautifully smooth and flavorful every time.
Preheat your oven to 325°F (160°C). Grease a 9-inch springform pan.
Make the crust: Combine graham cracker crumbs, sugar, finely ground pistachios, and melted butter. Press the mixture firmly into the bottom of the prepared pan.
Prepare the filling: Beat softened cream cheese and sugar until smooth. Add eggs one by one, mixing after each. Stir in sour cream, vanilla, and pistachio paste.
Pour and bake: Pour filling into the crust and bake for 45–50 minutes, until the edges are set but the center jiggles slightly.
Cool slowly: Turn off the oven and let it cool inside with the door closed for 1 hour.
Chill: Let it cool completely, then refrigerate at least 4 hours or overnight.
Make the topping: Whip heavy cream and powdered sugar until stiff peaks form, then fold in pistachio paste.
Decorate: Spread topping over chilled cheesecake and garnish with chopped pistachios.
And there you have it — a Pistachio Cheesecake that’s as stunning as it is delicious.
5. Baking Tips for a Flawless Cheesecake
A cheesecake can be temperamental, but a few insider tips can make all the difference:
Use room temperature ingredients. Cold cream cheese won’t blend smoothly.
Don’t overmix. Too much air causes cracks.
Use a water bath for even baking and a moist texture.
Avoid opening the oven door while baking — temperature changes cause sinking.
6. The Secret Behind the Perfect Crust
The crust sets the foundation for your Pistachio Cheesecake, and this version adds pistachios for an extra crunch and buttery flavor.
Press the crust mixture firmly but evenly across the bottom of the pan. If it’s too loose, it’ll crumble; too packed, it’ll harden. The goal? A tender yet stable base that supports the creamy filling like a golden stage beneath a spotlight.
7. Getting That Creamy Cheesecake Texture
The magic of a great cheesecake lies in its texture — silky, rich, and luscious.
Think of your cheesecake batter as a delicate cloud. Overbeating introduces too much air, turning that cloud into a thunderstorm of cracks. Mix just enough to combine ingredients smoothly. Baking slowly at low temperature ensures it stays creamy rather than dry.
8. Making the Pistachio Cream Topping
This topping is the cherry on top — or rather, the pistachio on top. It’s light, sweet, and beautifully nutty.
Whip the heavy cream and powdered sugar until soft peaks form. Then gently fold in the pistachio paste to create a fluffy, pastel-green cream. Spread it evenly over your chilled cheesecake for a luxurious finish.
9. Cooling and Setting Your Cheesecake Properly
Cooling is as important as baking. Rushing this step is a big no-no.
Letting the cheesecake cool in the oven with the door closed prevents cracks from sudden temperature shifts. Then, refrigerate for several hours — overnight is best. This allows the texture to firm up and the flavors to meld into creamy perfection.
10. Creative Garnishing Ideas
A few final touches can turn your cheesecake into a showstopper:
Sprinkle chopped pistachios for crunch and color.
Drizzle white chocolate for elegance.
Add edible gold flakes for a luxurious touch.
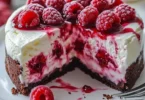
Or top with fresh raspberries for a pop of color and tartness.
Remember, we eat with our eyes first!
11. Why Pistachios Are the Star Ingredient
Pistachios aren’t just delicious — they’re power-packed with nutrients and flavor. Their natural sweetness and buttery texture make them ideal for desserts.
In this Pistachio Cheesecake, they bring balance — cutting through the richness with subtle earthy tones. It’s like the secret ingredient that turns a good dessert into an unforgettable one.
12. Common Mistakes to Avoid
Even seasoned bakers can make mistakes, but here’s how to avoid the most common ones:
Cracks on top: Caused by overbaking or rapid cooling.
Dense texture: Overmixing is usually the culprit.
Soggy crust: Don’t skip pre-baking the crust for 5 minutes if needed.
Uneven bake: Make sure your oven is preheated and consistent in temperature.
13. Serving and Storage Tips
Serve your Pistachio Cheesecake chilled, straight from the fridge. Use a warm knife for clean slices.
If you have leftovers (rarely happens!), cover tightly and refrigerate for up to 5 days. You can also freeze slices individually — just wrap them well in plastic and foil.
14. Variations You Can Try
Want to give your cheesecake a fun twist? Try these variations:
Chocolate Pistachio Cheesecake: Add melted white or dark chocolate to the filling.
Pistachio & Raspberry Swirl: Layer in raspberry purée for a fruity contrast.
Mini Pistachio Cheesecakes: Make individual servings in muffin tins.
Vegan Version: Substitute dairy ingredients with cashew cream and coconut yogurt.
Experimenting keeps dessert time exciting!
15. Final Thoughts
A Pistachio Cheesecake is more than a dessert — it’s a celebration of flavor, texture, and craftsmanship. The nutty crust, creamy filling, and velvety pistachio topping all come together in perfect harmony.
Whether it’s your first time making cheesecake or your fiftieth, this recipe delivers a masterpiece every single time. Each bite is a reminder that the best things in life are worth a little patience, a little love, and a handful of pistachios.
FAQs
1. Can I use store-bought pistachio paste for this recipe?
Yes! Store-bought pistachio paste works perfectly. Just make sure it’s 100% pistachio without added sugar or artificial colors.
2. What if I don’t have a springform pan?
You can use a regular round cake pan lined with parchment paper. Just be gentle when removing the cheesecake.
3. How can I prevent my cheesecake from cracking?
Bake it in a water bath and let it cool gradually in the oven. Also, avoid overmixing the batter.
4. Can I make Pistachio Cheesecake ahead of time?
Absolutely! It actually tastes better the next day. Make it a day before and refrigerate overnight.
5. What pairs well with Pistachio Cheesecake?
Try serving it with a drizzle of honey, a few fresh berries, or even a cup of espresso for a perfect finish.