Introduction
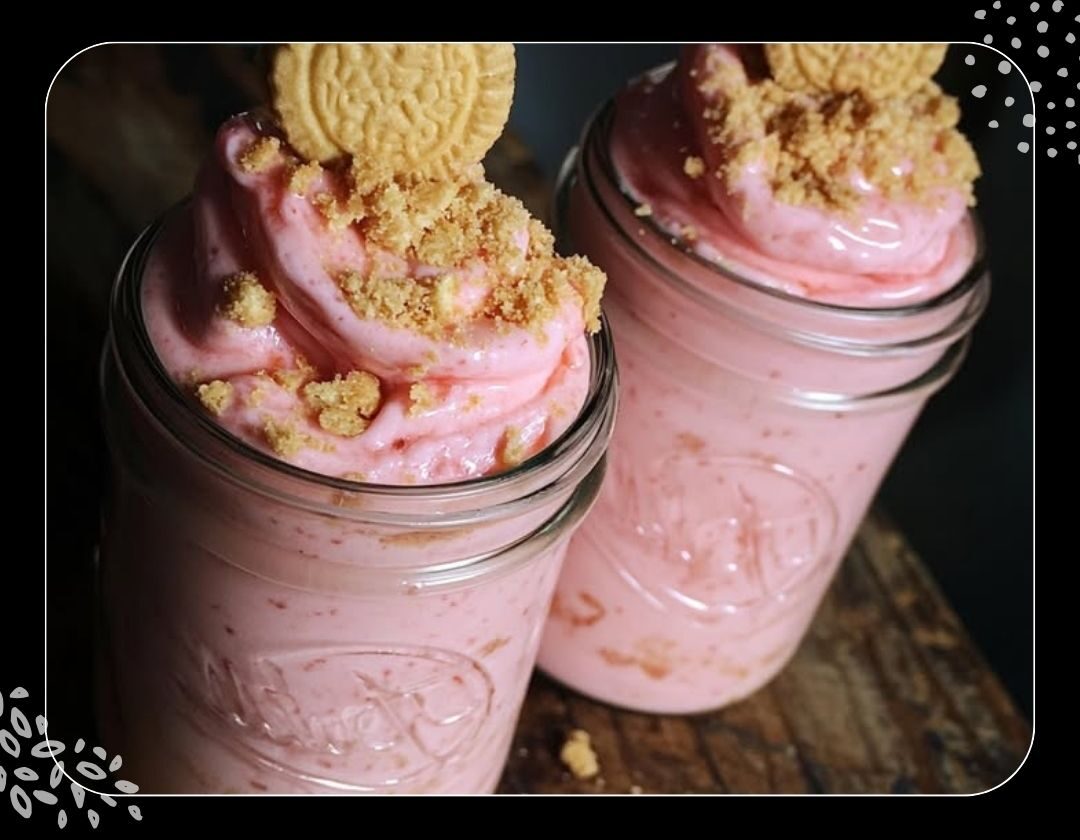
Ever dreamed of a dessert so light, creamy, and fruity that it feels like a sweet hug in a cup? That’s exactly what Strawberry Pink Pudding Cheesecake Cups offer. With layers of buttery graham cracker crust, smooth cheesecake filling, and refreshing strawberry pudding—these dessert cups are like little jars of joy.
Whether you’re making them for a party, a family treat, or just to satisfy your own sweet cravings, these no-bake wonders are your new go-to. Let’s dive in and learn how to craft this mouthwatering magic step-by-step!
1. Ingredients You’ll Need
Here’s everything you’ll need to whip up these heavenly cups:
For the crust:
1 cup graham cracker crumbs
½ cup unsalted butter, melted
¼ cup granulated sugar
For the cheesecake filling:
8 oz cream cheese, softened
½ cup powdered sugar
1 teaspoon vanilla extract
1 cup whipped topping (Cool Whip)
For the strawberry pudding:
1 (3.4 oz) package strawberry instant pudding mix
2 cups milk
1 cup fresh strawberries, diced
For garnish:
Whipped cream
Fresh strawberries
Optional: additional graham cracker crumbs
2. Why You’ll Love These Cheesecake Cups
What makes Strawberry Pink Pudding Cheesecake Cups so special? Well, imagine your taste buds dancing the tango!
They’re:
No-bake, which means no oven drama.
Quick to make with just 15 minutes of prep.
Perfectly portion-controlled—great for kids and adults alike.
A visually pleasing pink treat that screams celebration.
A dreamy combo of creamy, crunchy, and fruity in every spoonful!
3. Preparing the Graham Cracker Crust
This buttery base lays the foundation. Think of it as the “bed” for your cheesecake to rest on.
Steps:
In a medium bowl, mix graham cracker crumbs, melted butter, and sugar.
Stir until it forms a wet sand-like texture.
Spoon 1-2 tablespoons into each cup and press down firmly. You can use the back of a spoon or a small glass bottom.
Pro Tip: Chill this layer for 10 minutes to help it firm up before adding the filling.
4. Crafting the Creamy Cheesecake Filling
This is where the real magic begins. Light, airy, and slightly tangy, it complements the sweet crust and fruity top.
Steps:
Beat the softened cream cheese until smooth—no lumps allowed!
Add powdered sugar and vanilla extract. Mix until combined.
Gently fold in the whipped topping. Don’t stir too hard—you want it fluffy!
Analogy time: Folding the whipped topping in is like cuddling a cloud—be gentle!
5. Mixing the Strawberry Pink Pudding
This pink layer adds the fruity punch. Sweet, creamy, and colorful—it’s the star of the show.
Steps:
In a separate bowl, whisk the strawberry pudding mix and milk.
Whisk for about 2 minutes until it thickens.
Fold in the diced strawberries for that fresh fruit explosion.
6. Layering: The Art of Assembly
Now comes the fun part—assembling those gorgeous layers.
Steps:
Spoon the cheesecake filling over the chilled crust.
Add a layer of strawberry pudding on top.
If your cups are deep, repeat the layers for double the joy!
Pro Tip: Use a piping bag or spoon carefully to keep the sides clean for a pretty look.
7. Chill Time: Why It Matters
Think of this step as letting your dessert nap before the big reveal.
Why chill?
It helps the layers firm up.
Flavors meld together beautifully.
Makes it easier to eat with a spoon—no drippy mess!
Refrigerate for at least 2 hours or overnight if you can resist.
8. Garnishing Like a Pro
You eat with your eyes first, right?
Garnish Ideas:
A swirl of whipped cream on top
A fresh strawberry half or slice
A sprinkle of graham cracker crumbs
Go wild or keep it simple—either way, it’ll look divine.
9. Customizing Your Cheesecake Cups
Want to make them your own? Here’s how:
Swap strawberries for blueberries, raspberries, or even peaches.
Use chocolate graham crackers for the crust for a twist.
Add a layer of chocolate chips between cheesecake and pudding for surprise crunch.
10. Tips to Make It Even Better
Use room temperature cream cheese for smooth mixing.
Don’t overmix the pudding—it thickens quickly.
Choose ripe strawberries for max flavor and color.
11. Perfect Occasions for This Dessert
These cups shine on:
Valentine’s Day
Birthday parties
Mother’s Day brunch
Baby showers
Or… just because it’s Tuesday!
12. Storage and Shelf Life
Not eating them all at once? (Though we won’t judge if you do!)
Refrigerator: Store in an airtight container for up to 3 days.
Freezing: Not ideal—the texture of pudding and whipped topping may change.
13. Nutrition Breakdown (Per Serving)
While exact numbers can vary, here’s a rough estimate:
Calories: ~300–350
Fat: ~20g
Sugar: ~25g
Protein: ~4g
These are indulgent treats, meant to be savored!
14. Troubleshooting Common Mistakes
Runny filling? You may not have chilled long enough or added too much milk.
Lumpy cheesecake? Cream cheese wasn’t soft or beaten properly.
Crust falling apart? Add a touch more butter to bind it better.
15. Final Thoughts
Strawberry Pink Pudding Cheesecake Cups are more than just a dessert—they’re an experience. They combine simplicity with elegance and flavor with fun. With just a few basic ingredients and some love, you can craft a treat that will wow any crowd (or just yourself on a cozy night in).
They’re a beautiful reminder that you don’t need a fancy oven or hours of baking to enjoy something truly special.
FAQs
1. Can I use homemade whipped cream instead of Cool Whip?
Yes! Just make sure it’s whipped to stiff peaks for best results.
2. Can I prepare these cheesecake cups ahead of time?
Absolutely. Make them a day in advance and refrigerate until ready to serve.
3. Can I make a large tray instead of individual cups?
Definitely. Use an 8×8 dish and layer the same way for a family-style version.
4. Is there a substitute for graham crackers in the crust?
Sure—try digestive biscuits, vanilla wafers, or crushed Oreos.
5. How can I make these more kid-friendly?
Let kids help with layering and topping! Also, use fun mini jars or colorful cups.
Let your kitchen be filled with sweetness, and let every spoonful of Strawberry Pink Pudding Cheesecake Cups bring a smile to your face.
Happy no-baking!